Senior Cloud Consultant at CloudWay - Microsoft 365 specialist.
Highly certified within Microsoft 365, Intune, EMS, Azure, Teams, Cyber Security and more.
Versatile background, good documentation, technical flair, keen interest and ability to improvise are good ingredients in projects I’m involved in.
A clear brand builds identity and affiliation. Microsoft 365 and Endpoint Manager has a rich set of tools for customizing your brand into the products. This will look nice and integrated, and it will help the end users detect security attacks. Let's take a deep dive into the possibilities associated with branding your tenant and endpoints!
A brand is a name, term, design, symbol or any other feature that distinguishes one company's good or service from those of other companies. Brands are used for recognition, creating values and identification. A brand is the sum of all expressions by which an entity (person, organization, company, business unit, city, nation, etc.) intends to be recognized.
With a workforce spread all over the modern hybrid workplace, it is more important than ever to spread the love of the company's brand. This blogpost will focus on how your brand can be incorporated to Microsoft 365 and all endpoints by Microsoft Endpoint Manager.
This is a follow up on my last blog post covering automated teams voice assignment for users. This time I will cover how the mentioned routine has been expanded to do reporting in PowerBI to show evolution and distribution throughout the lifetime of the service.
In order to manage voice and phone number assignments in Microsoft Teams, you need at least Teams Communications Administrator role. This role does however have more privileges than most organizations want to assign to their first line staff. This blog post will cover a way for first line to automate voice activation of users with the granularity necessary to cover several technologies such as Direct Routing and Operator Connect.
The main idea is to let first line operators use the tools they have access to when managing users without the demand of acquiring extra privileges.
By adding the Teams phone number in E.164 format to the users telephoneNumber field in AD/AAD and assigning the user as member of a defined security group, I have enough information to automate the Teams voice assignment for the user. This could also include license assignment through the group membership.
It has been a while since Microsoft released their machine learning based noise suppression for Microsoft Teams. With this setting available all background noise like shuffling papers, slamming doors, barking dogs, and so on are effectively reduced. This technology has quickly fallen into our pattern of use - which in turn has led to expectations of finding this in the meeting rooms
The new hybrid workspace is the hottest trend right now. At any time, a hybrid workplace will consist of both remote workers and in-office workers. Synchronizing these groups of employees into a cohesive, collaborative unit can be quite a challenge in order to not leave one group feeling anonymized or voiceless.
Microsoft Teams rooms should bring organizations closer to the ideal of hybrid work giving remote side workers the same opportunities to actively participate in the meeting. We see constant developments to support this, like the recent Front Row Layout for meetings.
As a remote worker, I often find unintentional noise from meeting rooms to be the biggest disturbance in meetings. This can be all from paperwork, pens and fingers drumming on the table, cups and cutlery, small talk and meeting in meetings. I am therefore happy to finally see machine-based noise cancellation available on the Teams Rooms System.
When in a call, settings for noise suppression are now found on the meeting room controller:
Click on the image for a larger view
Teams offers three levels of noise suppression to help keep meeting participants focused. These settings can be changed at any time. For the Teams desktop app and iOS, the settings carries over to the next meeting or call once they are changed. This is not yet the case for Teams Room System.
The noise suppression feature can be enabled or disabled on the Teams Room Device by use of the NoiseSuppressionDefault variable found in an XML Configuration file as described here.
Click on the image for a larger view
The article describes several settings and how these can be implemented on devices in small and large scale. The documentation does not state how to set Low or High as the default setting. This has been discussed in this Twitter thread, where @MauroB94454117 states that the code implemented is ahead of documentation at this time. The documentation is missing the part on how to force noise suppression to Low or High settings. This is done with the following variables in the XML file which are tested and found Ok:
0 = Off 1 = Auto 2 = Low 3= High
The following XML file gave me the highest level of noise suppression as the default state:
These are small steps to a better hybrid workspace in the modern workplace!
Hardware based noise suppression
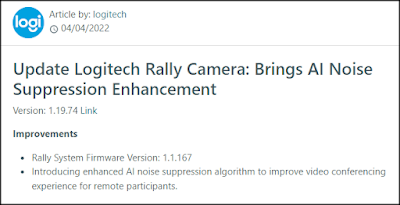
Logitech Rally cameras are also introducing AI noise suppression enhancement algorithms in their firmware version 1.1.167. This is to improve video conferencing experience for remote participants. This update is available for download from the Logi webpages.
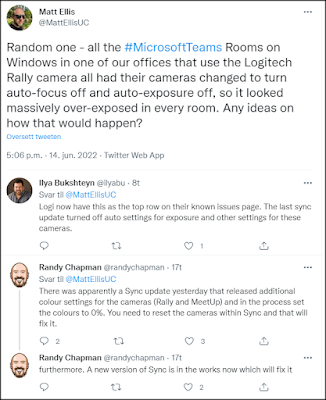
Normally updates of firmware and software brings new features and better security, but it also seems to introduce new unintentional problems - or "features". There are information in the community stating that the Logitech Rally Cameras might get problem with exposure and focus after updating. You can read about this on a fresh twitter message dialogue from Matt Ellis, Ilya Bukshteyn and Randy Chapman:
15.08.2022 - Video demo
Today a great video demo on this feature was released by ISDM Solutions - take a look here: https://youtu.be/gVvspCd0FaA
Teams fra Microsoft samler all kommunikasjon i ett og samme grensesnitt, og gjør det enklere for deg og dine kolleger å samarbeide, uavhengig av tid og sted. Løsningen blir enda bedre når Telenor integrerer telefoni i Microsoft Teams. Det gjør kommuniskasjonen enklere, smidigere og mer effektivt.
En kunde som har benyttet seg av denne løsningen er Istad Kraftselskap, et lokalt energikonsern med over 100 års historie, som holder til i Romsdal og på Nordmøre.
– Det hele begynte med at vi ønsket å bytte ut all gammel teknologi, og skifte ut de utdaterte telefonsentralene våre, sier Dyre Halse, IT sjef hos Istad.
Allerede i 2008 begynte bedriften å ta i bruk Microsofts chatte og videokonferanse-muligheter for å samarbeide – Office Communicator, Skype, Lync, og nå Teams. I det siste har det blitt enda viktigere for dem å få inn video i disse tjenestene, og dessuten integrere telefonien. Disse løsningene gjør at Halse og hans kolleger kan motta mobilsamtaler enten på mobilen eller på PCen i Teams, alt etter hva som passer. En kan fortsette samtalen en startet på PCen med et tastetrykk til sin mobil osv. Det er Serit Møre som har stått for oppsettet.
Reklamefilm i Telenor sin innpakking
– Du kan si at vi har vært med Istad på reisen helt fra Bell til Bill, altså fra Alexander Graham Bell fant opp telefonen til Bill Gates og Microsoft ledet IT revolusjonen, sier Simon Skotheimsvik, Senior Systems Consultant hos Serit Møre. Serit Møre er et ledende kompetansemiljø innen teknologi og IT-løsninger i Møre og Romsdal, med kontorer i Surnadal, Kristiansund og Molde.
– Dessuten skjer jo alt i skyen, med alle fordelene det medfører, enten det er enkel oppgradering, bedre sikkerhet eller med det lave fotavtrykket hos kunden, sier Skotheimsvik.
Dyre Halse hos Istad påpeker videre at det å kunne kjøre videomøter der «alt bare fungerer» og du enkelt kan hente opp informasjon fra tidligere møter eller kontaktpunkter, er elementer som gjør Teams så verdifullt for ham og organisasjonen.
– Det er en stor hjelp å kunne hente inn nye kolleger med sin kompetanse når vi trenger dem, det gjør oss mye mer effektive, kan han fortelle.
De opplever også at det å få all telefoni inn i Teams, med to helintegrerte systemer som fungerer så godt og raskt sammen, har gjort en enorm forskjell for kundene deres. Friheten til å ta jobbtelefoner fra hvor som helst, med full Teams-funksjonalitet som kalendre, filer og kontaktinformasjon, gjør arbeidshverdagen uendelig mye enklere. Serit forteller også at Microsoft har gjort en kjempejobb med å legge til rette for dem i forhandler og installatørleddet, så de kan tilby kunder som Istad de beste og nyeste løsningene.
The Modern Workplace supports the demand to work from anywhere. There are companies today operating mainly from home offices. How much technology is acceptable to use for hiding in the home office?
I have been experimenting with knowledge from the photography business and technology from youtuber's in the gaming industry to enrich my Microsoft Teams meetings from my home office. The goal has been to have high quality video conferencing with a simplified and quick operation. This attempt is presented in the following low cost one shot video.
Technical rundown
There has been some questions related to this setup on Twitter, so I decided to make a technical rundown of the setup.
Lights
In order to have a good picture with studio portrait quality, I need good lights. After exploring different options I ended up ordering an Elgato Key Light Air as my main light. This choice was a combination of price and lamp design and features. This lamp has a great stand, it connects wirelessly to my computer, it is cool and brightness and color can easily be controlled.
In addition I am using some Phillips Hue light sources. I have one color light source behind my monitors for ambience light, and in the ceiling I have a ledbar from IKEA which has been equipped with Hue GU10 white ambience light bulbs. I have created some scenes in the Hue system for my video conferencing setup. Two of the GU10 lights in the ceiling are pointed at the green screen trying to make an even light all over the screen. These lights has a cold temperature set in order to make the color of the green screen stand out. I have also pointed one of the GU10 hue lights towards my head to make a hair light for background separation. This light as a warmer tone set. I don't think I need any more fill lights for my current setup.
Workplace with hue ambient light
Workplace with hue ambient light and key light
Hue fill lights for green screen and hair light for background separation
Hue ambient light behind monitor
The Hue scene used for videoconferencing.
Green screen
I have considered several types of green screens. Based on my experiences in studio photography I wanted a solid type to avoid folds which in turn can be troublesome related to lighting and chroma key processing. I had my eyes on the roll-up versions from Elgato and Nebula. These are around 148 cm wide, and they seem easy to fold up an down. These can easily be found cheap on second hand webshops since there are a lot of fading youtube stars out there. I read some reviews and found them to require some floor space. They could in some circumstances also be wider. Some where experimenting with two of these to get enough width on the background - this is kind of tricky in order to get a perfect faded overlapping background.
I finally found the 190 cm wide Elgato Green Screen MT which can be easily mounted in the ceiling. This one will cover my entire bookshelf without taking up any space on the floor. I had some concerns related to the weight when mounted in the ceiling, but in practice this was not a problem. Unfortunately no Elgato Green Screen MT was found on second hand marketplaces, but it wasn't the most expensive one. When bought as new, I also got first class packaging and shipping. I certainly do not regret this choice.
Bookshelf and guitars with Green Screen MT rolled up in the ceiling
Bookshelf and guitars hidden behind Green Screen MT rolled down from the ceiling
Detail from the mounting of the Green Screen MT in the ceiling
Green Screen processing
In order to do a chroma key processing of the green screen, I am using the OBS Studio freeware. This is a software primarily made for streaming to Twitch, YouTube and other services. In this project I am using the VirtualCam function found in the Tools menu. This sends the output mix from OBS to Windows as a virtual camera driver and can therefore be selected as source in Microsoft Teams. The VirtualCam has been set to AutoStart.
Configuration of the VirtualCam in OBS
OBS-Camera selected as Camera in Teams - Settings - Devices - Camera
In OBS I have configured different scenes and scene transitions. Each scene can consist of a mix of several sources, including physical cameras attached to the computer, images, media sources and more. As a webcam I am currently using a Logi HD Pro WebCam C920. Inside OBS I have added a Chroma Key effect filter to this camera source in order to make a transparent background from the green screen. This combined with some environmental photos can make some exciting scenes. The OBS software has a lot of advanced opportunities, and you can easily find information and inspiration on this on YouTube.
1: Scenes, 2: Sources used in scenes, 3: Scene transitions, 4: Filters used on sources in scene
1: Add the Chroma Key filter, 2: Adjust the different variables, 3: Pay attention to the edge transitions
Filters
OBS has a rich pallette of options and third party plugins. One great valueadd to OBS studio is the StreamFX pluging which has a couple of great filters to enrich your setup. Alpha Gaming is giving a nice overview of this in his YouTube channel. I use the Blur filter from this package to add a small amount of blur on my background image. This technique can be used to imitate a picture with a shallow depth of view often seen by using DSLR's with pricy optics connected through Elgato Cam Link.
StreamFX Blur plugin applied to my background image
Props
When working on the different backgrounds, it is allways funny and effective to have props to put on your self in order to enhance the effect. A couple of examples in the following images.
Having a good time at my cottage
Having a good time at my home office, aka "jammekontor"
Having a rough time out in the field
Control Panel
In order to operate these technologies quick and easy, I am using a Stream Deck from Elgato. This system with all of its plugins has innumerable opportunities regarding automation and control. I have created many functions that support me throughout the day in the office.
Elgato Stream Deck located under my monitors
In order to easily do a Microsoft Teams meeting, I have set up a Multi Action button with 10 actionpoints [1: Launch OBS Studio, 2: Pause Spotify, 3: Set Hue scene for videoconferencing, 4: Turn on KeyLight, 5: Set Key Light temperature, 6: Set Key Light brightness, 7: Select OBS Scene, 8: Move Microsoft Teams to full screen, 9: Delay for 3s 10: Go to Calendar in Teams].
Configuration of the Multi Action button for starting a Teams meeting
Actions included in the Multi Action button for starting a Microsoft Teams meeting
In the same way I have created a Multi Action button with 4 actions to use when ending a Micreosoft Teams meeting [1: Play Spotify, 2: Set Hue scene for normal office work, 3: Turn off Key Light, 4: Minimize Microsoft Teams 4: End OBS Studio]
Actions included in the Multi Action button for ending a Microsoft Teams meeting
During a Teams meeting I have found it handy to have some special actions available. These are located in a separate folder containing a new set of buttons. Today I am using these to switch between the different scenes in OBS. These scenes includes different backgrounds, screensharing with talking head etc. I have also made a button for muting the microphone.
Stream Deck with OBS Scene controls and Mic mute
OBS Scenes with corresponding buttons for toggling sources on and off
Teams meeting with OBS VirtualCam
Teams meeting with OBS VirtualCam and Background Blur in Microsoft Teams
Teams meeting with OBS Scene in with screen sharing and talking head
The talking head challenge
I do experience some blured image quality on screensharing through OBS Virtual Camera plugin to Microsoft Teams meeting. I have tried to figure this out without any success yet. In a regular Teams meeting with VirtualCam, I don't think screensharing through OBS and VirtualCam is a good idea.
I have found a working setup for sharing your screen with a talking head directly to a Teams meeting. This requires multiple monitors. In my example I have a 3 monitor setup. This setup will give sufficient quality on the content shared into the meeting.
Monitor#1 is used as a stage, running OBS in fullscreen projection. I have a scene with content from Monitor#2 and a talking head overlay. I will share Monitor#1 into the Teams meeting.
Monitor#2 will be the workspace for content shared to the meeting. All content on this monitor will be shared to the meeting (powerpoints etc). A pro tip would be to place the cam and the workspace monitor in such a way that your head is looking inbound to the monitor in the shared window when working.
Monitor#3 is my Teams management monitor used to control the Teams meeting, OBS settings etc. This should be the main monitor for popups etc.
Three monitor setup for sharing screen with talking head into Teams
Right click in the preview and select Fullscreen Projector
Stream Timer
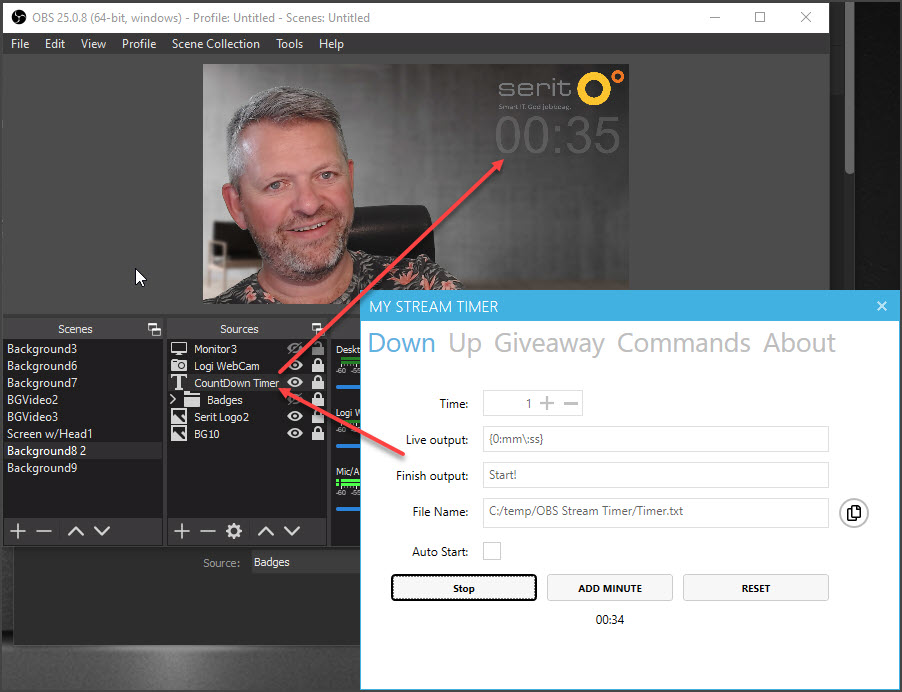
In some cases, a counter is desirable. This is often done with the help of a third party software updating a txt file which is added as a text layer in OBS. There are many free providers, some simple while others are more advanced. One example is http://www.mystreamtimer.com/ which can do both count down and count up in addition to have a leading text and a separate ending text. This can even be triggered directly from Stream Deck! Another simple one is the free Countdown Timer v2.0.
I got challenged by Ståle Hansen to include his Pomodoro powershell script into the Stream Deck. This has been testet and found Ok. I had some initial problems when using the "advanced launcher" plugin loading "C:\Windows\System32\WindowsPowerShell\v1.0\powershell.exe -file Start-SimplePomodoro.ps1". This powershell session didn't find the "presentationsettings" command. I had to use the "Super Macro" plugin instead. Now I have a separate button on my Stream Deck for launching 20 minutes of focus with no distractions.
Pomodoro powershell added as a button in my Stream Deck.
Alternative Pomodoro routine created with actions in Stream Deck
Embrava Busy Light
After the korona virus breakout, I have had my house full of three kids since the norwegian schools and kindergardens where closed. In order to let the kids know my working status at the home office, I have extended my home office setup with an Embrava Blynclight. This light indicates when I am "on air". This gives a better experience to my calls and meetings run from the home office during this pandemy.
Busy light on my monitor before it was moved next to the door leading to the home office.
PS! After a quick computer reset (windows autopilot), I had a problem connecting the blynclight to Microsoft Teams. This got solved after installing the Skype for Business client (the Office installation came without SFB client which I needed for customer support). Embrava support has investigated this issue and found that the Office 365 installation suite some times corrupting the registry keys required for Office Chat API interface. If such registry keys are corrupted then the Office Chat API interface won't work. A re-install or repair of the Office installation are often fixing this issue. In my case, the installation of the Skype for Business Client did. Embrava is working on a new driver version connecting directly to the Microsoft Teams server in order to get arround this problem. My guess is that they will use the Microsoft Graph API.
Snap Camera
Snapchat has lauched the Snap Camera application for Windows and MAC, bringing the magic of lenses to the video chats on PC & Mac. This can be used directly into Teams, and it can also be included in the OBS Studio. Could be kind of funny in some situations, but mostly annoying. It is also annoying that Snap Camera requires exclusive access to the webcams on your computer.
Webcamera as source
In the new Windows 10 2004 update (build 18995), it is possible for users to associate network cameras to their PC, enabling photo capture and streaming of video in camera applications. Currently Windows only supports ONVIF Profile S compliant cameras*, which are standards-compliant network cameras optimized for real-time streaming video capture. Windows provides support for discovery, pairing, configuration and streaming via WinRT APIs. These settings are described in this website. I can't wait to use a live webcamera as a source in my OBS setup!
Logitech Capture
Logitech Capture is an alternative software for managing multiple content, talking head etc. I have done some small tests, but it will not replace my usage of OBS studio. It does not integrate into the Elgato Setup, and the chroma key functions are poor compared to OBS.
Testing Logitech Capture.
Teams Customized Backgrounds
Microsoft is rolling out customized backgrounds as part of the native Teams experience. This means you now can replace the background directly in Microsoft Teams. You will find this option as part of the background blur in your Teams client. This is a nice lowcost feature, but it does not compare to a full green screen setup, and all the features you have in OBS studio - for instance add a background video.
Microsoft will sooon release the option to upload your personal images. You can however do this manually by copying your photos to the following folder: %APPDATA%\Microsoft\Teams\Backgrounds\Uploads\
Select background blur and pick your preferred background.
I have added a screenshot of my normal background with me present. Now I can walk away from the meeting but still be present :)
Use with other video systems
I have used this OBS Studio setup with the virtual camera plugin with other video systems as well - even Skype for Business. This proves that this setup is universal to all systems utilizing a webcamera on the computer.
End notes
Is this acceptable use of technology or is it overkill? Is this something you could imagine in your office or home office? Microsoft has announced a customized background feature in Microsoft Teams comming later this year. Could it be a good idea to paint a wall in your office green and install a key light for better quality during Microsoft Teams Meetings?
We are experiencing some problems related to booking of exchange room resources in Microsoft Teams. Some meetings are not booked in the Exchange room resource calendar which might result in problem with double-booking of the physical room and problems connecting to the meeting from a Skype Room System.
A Teams meeting can be booked from both Outlook Calendar and from the Microsoft Teams client. If you are booking the meeting in Outlook Calendar and the Teams meeting plug in, you can’t select a corresponding Teams Channel for the meeting. It is therefor preferable to use the meetings tab in the Teams Client for booking the Teams meeting. In order to have the Exchange Room Resources available in Microsoft Teams, you have to add the Exchange resources to distribution groups.
I have spent some time researching the problem with missing bookings from Teams meetings in Exchange room resources. The research made the following findings:
If the room resource is selected before Team/Channel is selected, the room is not booked in the Exchange calendar for the room resource.
If a Teams meeting with a meeting room is edited afterwards, the Exchange room calendar loses its booking.
I guess this will be fixed soon on the Microsoft Teams client. Until then, we have to make sure to do the booking variables correctly and in the correct sequence:
Choose Channel before meeting room
If you have any experience related to this issue, I would be glad to hear!