Senior Cloud Consultant at CloudWay - Microsoft 365 specialist.
Highly certified within Microsoft 365, Intune, EMS, Azure, Teams, Cyber Security and more.
Versatile background, good documentation, technical flair, keen interest and ability to improvise are good ingredients in projects I’m involved in.
This is a follow up on my last blog post covering automated teams voice assignment for users. This time I will cover how the mentioned routine has been expanded to do reporting in PowerBI to show evolution and distribution throughout the lifetime of the service.
In order to manage voice and phone number assignments in Microsoft Teams, you need at least Teams Communications Administrator role. This role does however have more privileges than most organizations want to assign to their first line staff. This blog post will cover a way for first line to automate voice activation of users with the granularity necessary to cover several technologies such as Direct Routing and Operator Connect.
The main idea is to let first line operators use the tools they have access to when managing users without the demand of acquiring extra privileges.
By adding the Teams phone number in E.164 format to the users telephoneNumber field in AD/AAD and assigning the user as member of a defined security group, I have enough information to automate the Teams voice assignment for the user. This could also include license assignment through the group membership.
Companies that have gone through several generations of IT systems will have to make their cloud journey in small steps - system by system. Devices and document storage are quickly moved to Microsoft 365. Special Line of Business systems may take longer to cloudify. This can present challenges in making data from dinosaur systems available to users of the modern Microsoft 365 platform.
The challenge from a real world scenario
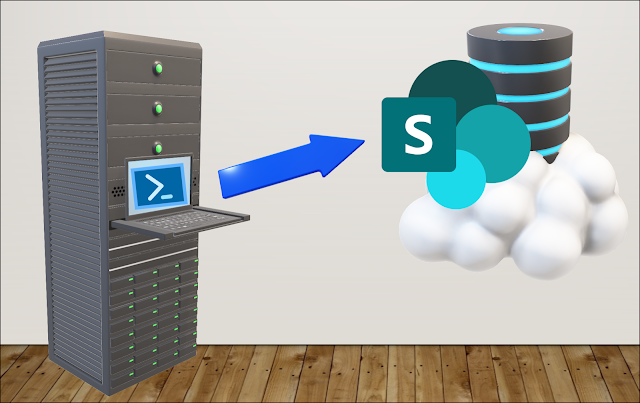
I was challenged by a customer with a production environment running in an old on premises environment while all users and endpoints had converted to Microsoft 365. They had challenges in reaching reports that were produced on premises and needed a solution to have this data automatically uploaded to Sharepoint for easy and modern access. Challenge accepted!
Those of you which has read through the Microsoft services agreement might have noticed paragraph 6b where Microsoft recommends that you regularly backup your content and data that you store on the services using third-party apps and services. One example of such third party tool popular by managed service providers is the Veeam Backup for Microsoft 365. This blog post will explain how you can get automatic reporting on licenses and sizes used by this application.
Please note: This is not a sponsored post!
Data Deletion
Data deletion can occur when an attacker deletes your data, usually in a way that makes recovery difficult, if not impossible. A variant of this type of attack includes ransomware. With ransomware, an attacker compromises the network, encrypts data, and then demands a payment to get the key to decrypt the data. This may equate to data deletion since a successful extraction of payment often leads to more targeting by the attacker. Attacker motivations for data deletion covering the tracks of an attack, attempting to do irreparable harm to your business, or simply trying to spite you or your employees
Preventing data deletion
Other than the protection mechanisms you should employ to prevent account breach an elevation of privileges, your core prevention strategy should be to ensure you have sufficient redundancies built into your data management processes to minimize the impact of data deletion. Data in Microsoft 365 is made redundant for maximum availability by the service. However, it's still possible for an attacker to delete data from SharePoint sites and recycle bins, making it almost impossible to recover. There is also examples of bugs where data has been deleted from Teams and Sharepoint. Therefore, it's critical that you have a process for backing up mission critical data to offline stores - just like the Microsoft Services Agreement states.
Veeam Backup for Microsoft Office 365
Veeam Backup for Microsoft 365 is one application which can help eliminate the risk of losing access and control over your Office 365 data, including Exchange Online, SharePoint Online, OneDrive for Business and Microsoft Teams. This product is often used by managed service providers offering their services to customers. One challenge will be to automate a reporting solution showing the usage of the service related to license and storage on repositories.
Report automation
Niels Engelen has described a way to automatically send reports from Veeam by email. This is a simple approach to the standard functionality where PDF report will be sent by e-mail. It just didn't fit my expectations for reporting.
PowerShell data harvesting
I have studied the Veeam Backup for Microsoft 365 PowerShell Reference and made a script counting all licenses, data usage and repository usage on a daily basis. This data is prepared in a JSON format and uploaded to an Azure Cosmos Database. The Azure Cosmos Database is quite inexpensive for this kind of usage.
The following query will list all licensed users in a JSON format before uploading each record to the Cosmos database.
# Get VBO Licensed users, convert to JSON and upload to CosmosDB
The third query will get information about the repositories defined in Veeam Backup for Microsoft 365 and upload this in JSON format to the Cosmos Database. The original data values from the queries are in bytes format.
# Get VBO Repositories, convert to JSON and upload to CosmosDB
Using PowerBI Desktop, it is easy to connect to the Cosmos Database. With the data loaded into Microsoft PowerBI you can do further manipulations of the data using DAX queries. One example could be to calculate the difference between capacity and free space for the repositories in order to get the used space pr. repository. This could be done like this which will return a separate column with the result ready to use in the report:
Using Power BI we can easily create several reports to visualize the status of the service.
Example of monthly report of all companies and users protected by Veeam 365 Backup which can be the basis for invoicing where this is based on the number of users in the system pr. company.
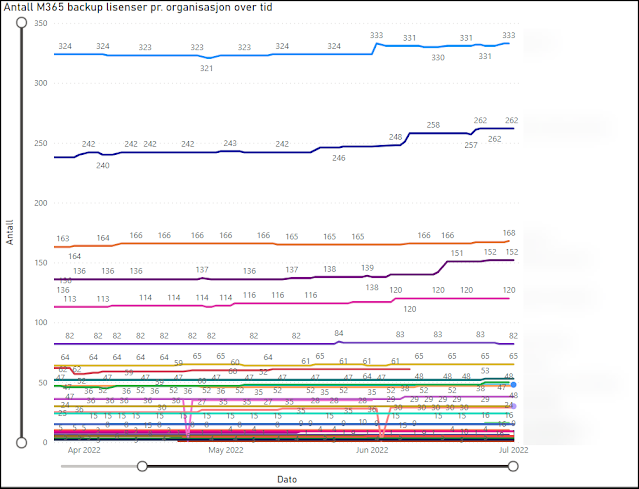
Example of historical development of backup up users pr. company by Veeam 365 backup.
Example of gigabyte compared to number of users pr. company protected by Veeam 365 backup.
Example of usage of the calculated column for GB pr User. Infinity comes from stored data for customers which have terminated their contract where data still exists. This has been removed from the graph with a visuals filter displaying only companies with more than 0 users.
Example of report for repositories with forecast in the Veeam 365 backup service.
This gives a fully automated always up to date reporting solution showing current usage and historical development related to the provided service, license usage and storage consumptions. The reports can easily be filtered by clicking on the values and graphs giving the consumer of the reports the ability to select the desired view.
The animation is blured to protect the data exposed in the report
If you upload your PowerBI report to the online PowerBI service, you can set the dataset to automatically update directly from the Cosmos Database. This will allow for online consumption of the report from all your devices. One idea could be to add it as a tab in a suitable team channel in Microsoft Teams giving easy access for everyone interested in the topic.
I do believe someone could have interest in the PowerBI Report file, but unfortunately this can't be shared because my reports contains PII data.
Conclusion
I hope this could inspire someone to dive into data capturing and report building. If you have thoughts, ideas, comments or ideas after reading this far, please add a comment.
Cloud based IT solutions does have a pretty predictive cost when each and every license is based on a price pr user pr month. This should make it easy to budget the cost of each user role. The challenge might be to have an up to date overview of the license portfolio, both current and over time.
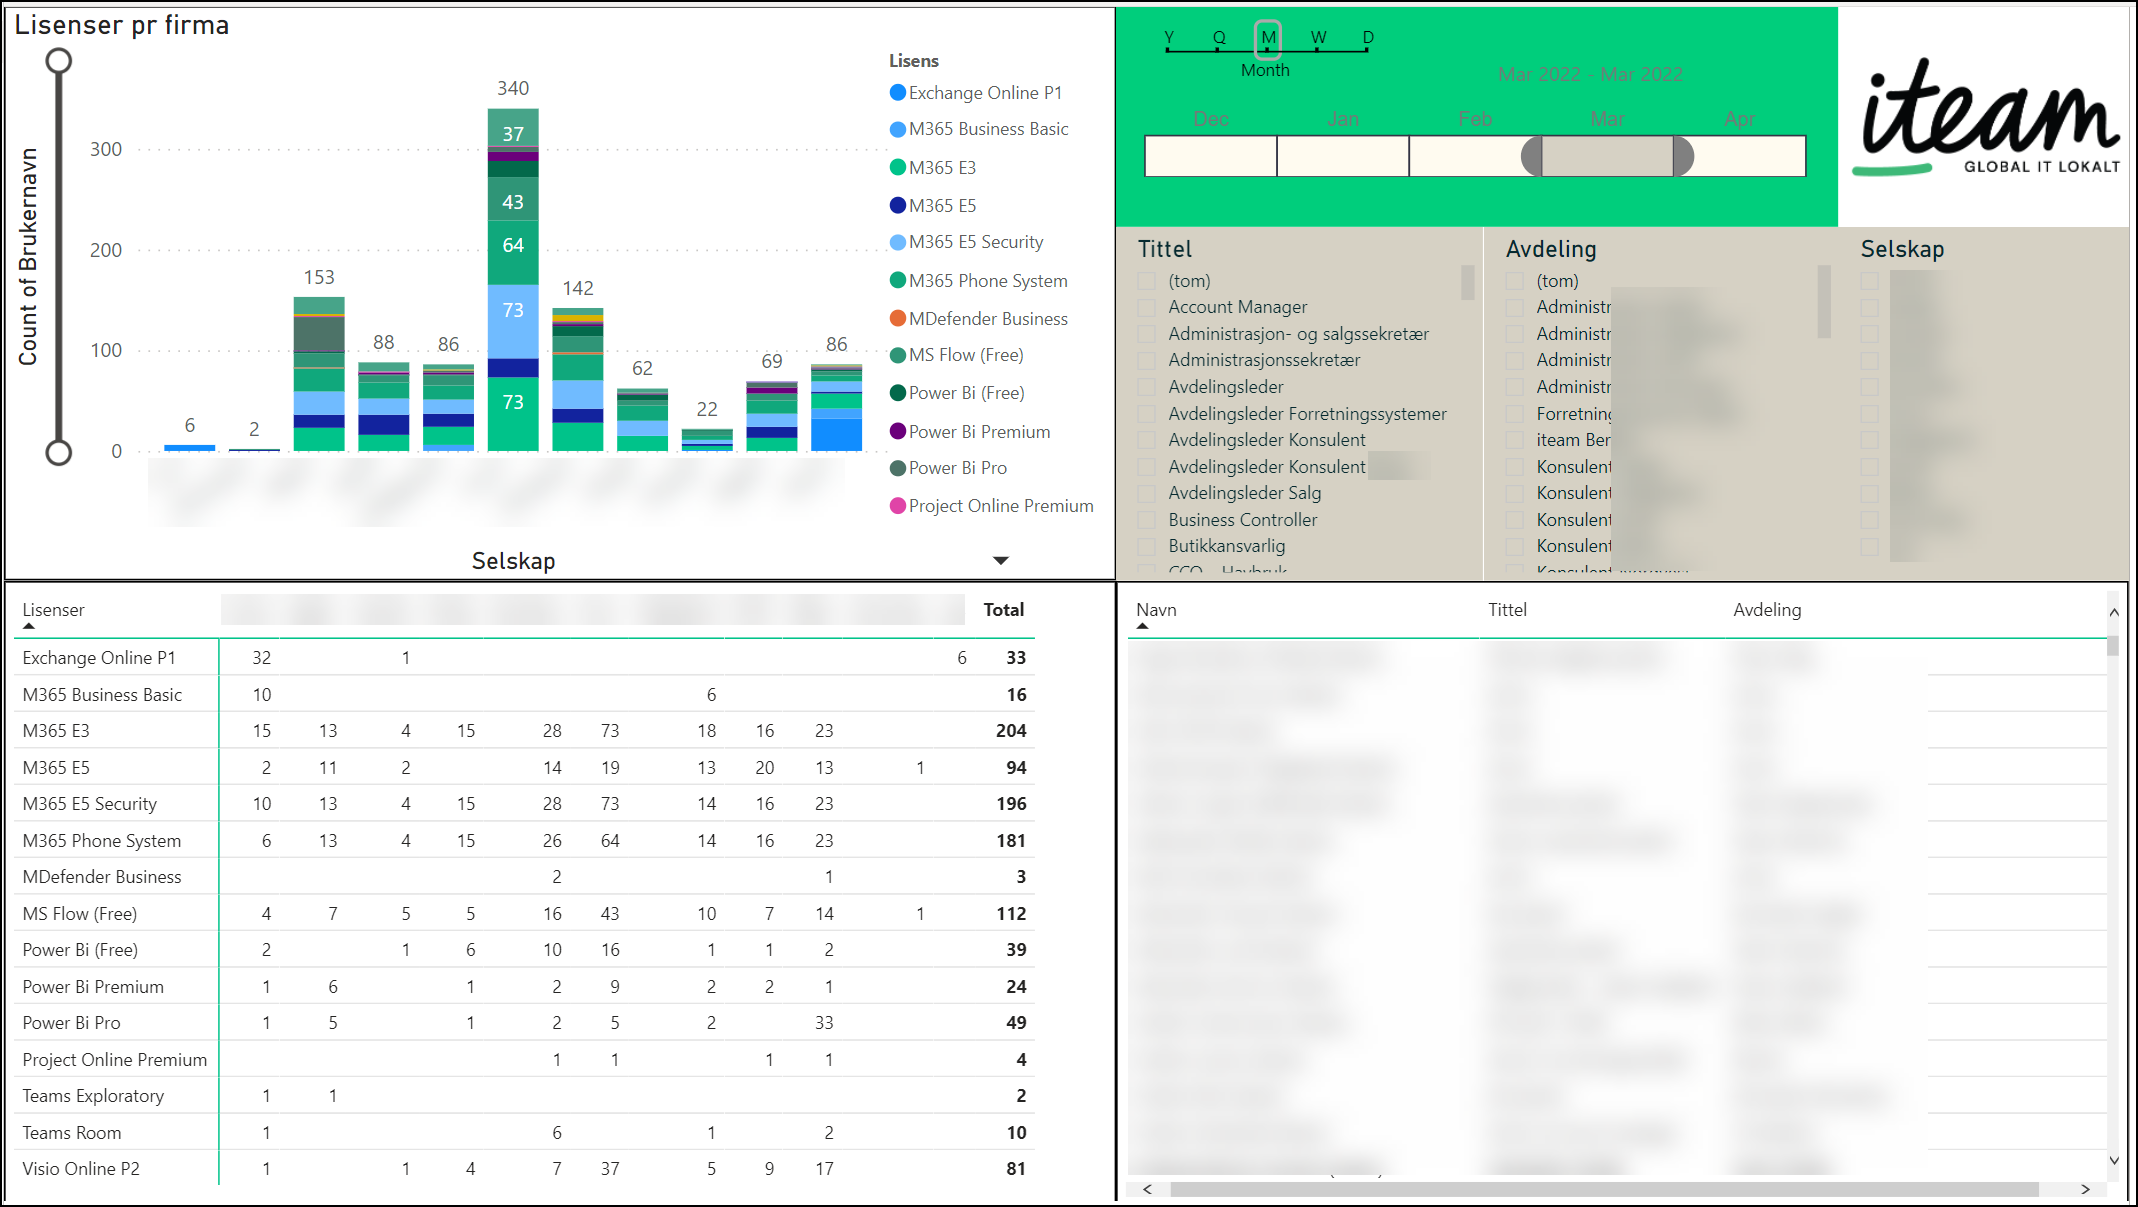
In order to give automated insights to the license situation, I have made a solution which has been installed at several tenants. Based on Microsoft Graph API powershell queries for running in Azure function apps, I am populating license information data from user accounts to a cheap Azure Cosmos DB. These data are then connected to PowerBI where I have created a report giving a detailed insight to the license portfolio pr. company, department, user. The report which can be granulated on year. quarter, month, week or day gives an accurate insight to the consumption of Microsoft licenses in the tenant, which helps address any misconfigurations.
The report has several pages, where the first page gives an overview over license consumption based on company/department with both a graphical and detailed table overview as well as personal details. The report can easily be filtered by clicking on the values in each part of the report.
Click for a larger version
Page two of the report has got a timeline showing the development of Microsoft licenses over time. The report can be filtered by company/department, license or user. This gives an insight to license usage which can't be found elsewhere. The picture below is an example where you clearly can spot a change in SKUs on a large amount of users over time.
Click for a larger version
In some cases there has been developed even further report pages in order to address the need of insights to the usage of Microsoft licenses, and these reports have several times been used to detect misallocated licenses which in turn have resulted in significant cost savings over time. An example of such report could be the one including groups used to assign licenses to the user accounts.
Click for a larger version
Regarding costs for running the function and cosmosdb in Azure, they seems to be reasonably low. A typically SMB company with arround 200 users shows cost arround 5 NOKs for one month.
Please let me know if you find this kind of technological usage interesting.
The Modern Workplace supports the demand to work from anywhere. There are companies today operating mainly from home offices. How much technology is acceptable to use for hiding in the home office?
I have been experimenting with knowledge from the photography business and technology from youtuber's in the gaming industry to enrich my Microsoft Teams meetings from my home office. The goal has been to have high quality video conferencing with a simplified and quick operation. This attempt is presented in the following low cost one shot video.
Technical rundown
There has been some questions related to this setup on Twitter, so I decided to make a technical rundown of the setup.
Lights
In order to have a good picture with studio portrait quality, I need good lights. After exploring different options I ended up ordering an Elgato Key Light Air as my main light. This choice was a combination of price and lamp design and features. This lamp has a great stand, it connects wirelessly to my computer, it is cool and brightness and color can easily be controlled.
In addition I am using some Phillips Hue light sources. I have one color light source behind my monitors for ambience light, and in the ceiling I have a ledbar from IKEA which has been equipped with Hue GU10 white ambience light bulbs. I have created some scenes in the Hue system for my video conferencing setup. Two of the GU10 lights in the ceiling are pointed at the green screen trying to make an even light all over the screen. These lights has a cold temperature set in order to make the color of the green screen stand out. I have also pointed one of the GU10 hue lights towards my head to make a hair light for background separation. This light as a warmer tone set. I don't think I need any more fill lights for my current setup.
Workplace with hue ambient light
Workplace with hue ambient light and key light
Hue fill lights for green screen and hair light for background separation
Hue ambient light behind monitor
The Hue scene used for videoconferencing.
Green screen
I have considered several types of green screens. Based on my experiences in studio photography I wanted a solid type to avoid folds which in turn can be troublesome related to lighting and chroma key processing. I had my eyes on the roll-up versions from Elgato and Nebula. These are around 148 cm wide, and they seem easy to fold up an down. These can easily be found cheap on second hand webshops since there are a lot of fading youtube stars out there. I read some reviews and found them to require some floor space. They could in some circumstances also be wider. Some where experimenting with two of these to get enough width on the background - this is kind of tricky in order to get a perfect faded overlapping background.
I finally found the 190 cm wide Elgato Green Screen MT which can be easily mounted in the ceiling. This one will cover my entire bookshelf without taking up any space on the floor. I had some concerns related to the weight when mounted in the ceiling, but in practice this was not a problem. Unfortunately no Elgato Green Screen MT was found on second hand marketplaces, but it wasn't the most expensive one. When bought as new, I also got first class packaging and shipping. I certainly do not regret this choice.
Bookshelf and guitars with Green Screen MT rolled up in the ceiling
Bookshelf and guitars hidden behind Green Screen MT rolled down from the ceiling
Detail from the mounting of the Green Screen MT in the ceiling
Green Screen processing
In order to do a chroma key processing of the green screen, I am using the OBS Studio freeware. This is a software primarily made for streaming to Twitch, YouTube and other services. In this project I am using the VirtualCam function found in the Tools menu. This sends the output mix from OBS to Windows as a virtual camera driver and can therefore be selected as source in Microsoft Teams. The VirtualCam has been set to AutoStart.
Configuration of the VirtualCam in OBS
OBS-Camera selected as Camera in Teams - Settings - Devices - Camera
In OBS I have configured different scenes and scene transitions. Each scene can consist of a mix of several sources, including physical cameras attached to the computer, images, media sources and more. As a webcam I am currently using a Logi HD Pro WebCam C920. Inside OBS I have added a Chroma Key effect filter to this camera source in order to make a transparent background from the green screen. This combined with some environmental photos can make some exciting scenes. The OBS software has a lot of advanced opportunities, and you can easily find information and inspiration on this on YouTube.
1: Scenes, 2: Sources used in scenes, 3: Scene transitions, 4: Filters used on sources in scene
1: Add the Chroma Key filter, 2: Adjust the different variables, 3: Pay attention to the edge transitions
Filters
OBS has a rich pallette of options and third party plugins. One great valueadd to OBS studio is the StreamFX pluging which has a couple of great filters to enrich your setup. Alpha Gaming is giving a nice overview of this in his YouTube channel. I use the Blur filter from this package to add a small amount of blur on my background image. This technique can be used to imitate a picture with a shallow depth of view often seen by using DSLR's with pricy optics connected through Elgato Cam Link.
StreamFX Blur plugin applied to my background image
Props
When working on the different backgrounds, it is allways funny and effective to have props to put on your self in order to enhance the effect. A couple of examples in the following images.
Having a good time at my cottage
Having a good time at my home office, aka "jammekontor"
Having a rough time out in the field
Control Panel
In order to operate these technologies quick and easy, I am using a Stream Deck from Elgato. This system with all of its plugins has innumerable opportunities regarding automation and control. I have created many functions that support me throughout the day in the office.
Elgato Stream Deck located under my monitors
In order to easily do a Microsoft Teams meeting, I have set up a Multi Action button with 10 actionpoints [1: Launch OBS Studio, 2: Pause Spotify, 3: Set Hue scene for videoconferencing, 4: Turn on KeyLight, 5: Set Key Light temperature, 6: Set Key Light brightness, 7: Select OBS Scene, 8: Move Microsoft Teams to full screen, 9: Delay for 3s 10: Go to Calendar in Teams].
Configuration of the Multi Action button for starting a Teams meeting
Actions included in the Multi Action button for starting a Microsoft Teams meeting
In the same way I have created a Multi Action button with 4 actions to use when ending a Micreosoft Teams meeting [1: Play Spotify, 2: Set Hue scene for normal office work, 3: Turn off Key Light, 4: Minimize Microsoft Teams 4: End OBS Studio]
Actions included in the Multi Action button for ending a Microsoft Teams meeting
During a Teams meeting I have found it handy to have some special actions available. These are located in a separate folder containing a new set of buttons. Today I am using these to switch between the different scenes in OBS. These scenes includes different backgrounds, screensharing with talking head etc. I have also made a button for muting the microphone.
Stream Deck with OBS Scene controls and Mic mute
OBS Scenes with corresponding buttons for toggling sources on and off
Teams meeting with OBS VirtualCam
Teams meeting with OBS VirtualCam and Background Blur in Microsoft Teams
Teams meeting with OBS Scene in with screen sharing and talking head
The talking head challenge
I do experience some blured image quality on screensharing through OBS Virtual Camera plugin to Microsoft Teams meeting. I have tried to figure this out without any success yet. In a regular Teams meeting with VirtualCam, I don't think screensharing through OBS and VirtualCam is a good idea.
I have found a working setup for sharing your screen with a talking head directly to a Teams meeting. This requires multiple monitors. In my example I have a 3 monitor setup. This setup will give sufficient quality on the content shared into the meeting.
Monitor#1 is used as a stage, running OBS in fullscreen projection. I have a scene with content from Monitor#2 and a talking head overlay. I will share Monitor#1 into the Teams meeting.
Monitor#2 will be the workspace for content shared to the meeting. All content on this monitor will be shared to the meeting (powerpoints etc). A pro tip would be to place the cam and the workspace monitor in such a way that your head is looking inbound to the monitor in the shared window when working.
Monitor#3 is my Teams management monitor used to control the Teams meeting, OBS settings etc. This should be the main monitor for popups etc.
Three monitor setup for sharing screen with talking head into Teams
Right click in the preview and select Fullscreen Projector
Stream Timer
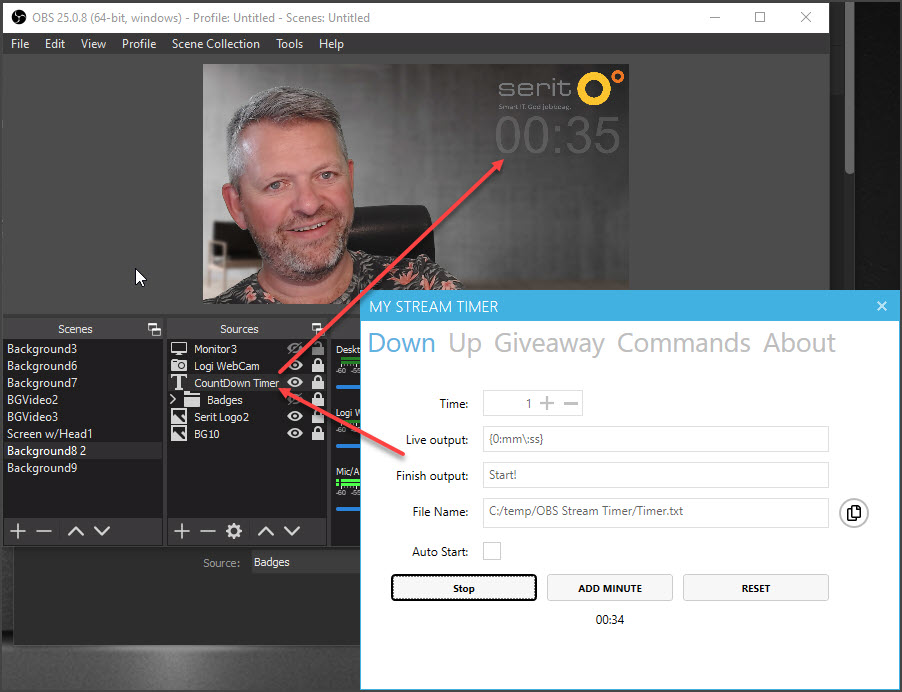
In some cases, a counter is desirable. This is often done with the help of a third party software updating a txt file which is added as a text layer in OBS. There are many free providers, some simple while others are more advanced. One example is http://www.mystreamtimer.com/ which can do both count down and count up in addition to have a leading text and a separate ending text. This can even be triggered directly from Stream Deck! Another simple one is the free Countdown Timer v2.0.
I got challenged by Ståle Hansen to include his Pomodoro powershell script into the Stream Deck. This has been testet and found Ok. I had some initial problems when using the "advanced launcher" plugin loading "C:\Windows\System32\WindowsPowerShell\v1.0\powershell.exe -file Start-SimplePomodoro.ps1". This powershell session didn't find the "presentationsettings" command. I had to use the "Super Macro" plugin instead. Now I have a separate button on my Stream Deck for launching 20 minutes of focus with no distractions.
Pomodoro powershell added as a button in my Stream Deck.
Alternative Pomodoro routine created with actions in Stream Deck
Embrava Busy Light
After the korona virus breakout, I have had my house full of three kids since the norwegian schools and kindergardens where closed. In order to let the kids know my working status at the home office, I have extended my home office setup with an Embrava Blynclight. This light indicates when I am "on air". This gives a better experience to my calls and meetings run from the home office during this pandemy.
Busy light on my monitor before it was moved next to the door leading to the home office.
PS! After a quick computer reset (windows autopilot), I had a problem connecting the blynclight to Microsoft Teams. This got solved after installing the Skype for Business client (the Office installation came without SFB client which I needed for customer support). Embrava support has investigated this issue and found that the Office 365 installation suite some times corrupting the registry keys required for Office Chat API interface. If such registry keys are corrupted then the Office Chat API interface won't work. A re-install or repair of the Office installation are often fixing this issue. In my case, the installation of the Skype for Business Client did. Embrava is working on a new driver version connecting directly to the Microsoft Teams server in order to get arround this problem. My guess is that they will use the Microsoft Graph API.
Snap Camera
Snapchat has lauched the Snap Camera application for Windows and MAC, bringing the magic of lenses to the video chats on PC & Mac. This can be used directly into Teams, and it can also be included in the OBS Studio. Could be kind of funny in some situations, but mostly annoying. It is also annoying that Snap Camera requires exclusive access to the webcams on your computer.
Webcamera as source
In the new Windows 10 2004 update (build 18995), it is possible for users to associate network cameras to their PC, enabling photo capture and streaming of video in camera applications. Currently Windows only supports ONVIF Profile S compliant cameras*, which are standards-compliant network cameras optimized for real-time streaming video capture. Windows provides support for discovery, pairing, configuration and streaming via WinRT APIs. These settings are described in this website. I can't wait to use a live webcamera as a source in my OBS setup!
Logitech Capture
Logitech Capture is an alternative software for managing multiple content, talking head etc. I have done some small tests, but it will not replace my usage of OBS studio. It does not integrate into the Elgato Setup, and the chroma key functions are poor compared to OBS.
Testing Logitech Capture.
Teams Customized Backgrounds
Microsoft is rolling out customized backgrounds as part of the native Teams experience. This means you now can replace the background directly in Microsoft Teams. You will find this option as part of the background blur in your Teams client. This is a nice lowcost feature, but it does not compare to a full green screen setup, and all the features you have in OBS studio - for instance add a background video.
Microsoft will sooon release the option to upload your personal images. You can however do this manually by copying your photos to the following folder: %APPDATA%\Microsoft\Teams\Backgrounds\Uploads\
Select background blur and pick your preferred background.
I have added a screenshot of my normal background with me present. Now I can walk away from the meeting but still be present :)
Use with other video systems
I have used this OBS Studio setup with the virtual camera plugin with other video systems as well - even Skype for Business. This proves that this setup is universal to all systems utilizing a webcamera on the computer.
End notes
Is this acceptable use of technology or is it overkill? Is this something you could imagine in your office or home office? Microsoft has announced a customized background feature in Microsoft Teams comming later this year. Could it be a good idea to paint a wall in your office green and install a key light for better quality during Microsoft Teams Meetings?
First impressions will always be important, but now that we conduct so many of our initial interactions online, virtual personal branding has become as important as the firm handshake once was in introducing yourself to the world. Hence a corporate headshot is an opportunity to portray a brand image to potential customers.
In business we spend a lot of money on branding across logos, websites, literature, packaging and premises. Is the photographic representation of you and your coworkers the place to scrimp on branding? Probably not. Whether you are posting your headshot on you Companys website, or want to post it on social media pages, you are always representing your business in one way or another. A professional headshot will put confidence into you business and make your clients more willing to deal with you.
Think about it for a moment - if you were searching for a new supplier and found that a certain company was a very viable supplier, but the corporate headshots had an unprofessional style - would you be willing to deal with this company? If you want to get the most out of your digital presence, a professional corporate headshot will allow you and your colleges to achieve a good appearance.
Getting the most from your head shot
If you decide to make corporate headshots of you and your company, you will have to deal with a lot of questions related to dress codes, style of the images etc. You need to book a photographer and put up a schedule for your co-workers to get photographed.
Me doing corporate headshots of a company
Pictures received - now what?
Once the photo session is finished you will receive a portfolio of pictures from the photographer. Now you need a plan how to distribute and use these pictures in order to give the best return of Investment.
Corporate Headshost received - time to distribute and use the pictures
Social Media has been a large consumer of headshots for a long time. We have also seen headshots as impersonators in corporate software for a while. The challenge now will be to utilize the new portfolio of headshots over the wide array of software og systems supporting personal portraits.
Active Directory, Exchange and Skype for Business
Portraits can be added to each user account in Active Directory as a thumbnail. There are several tools available for this operation out on the wild internet. We have preferred a PowerShell script to deal with this operation. Pictures are being adjusted and exported to a folder in the format of sAMAccountName.jpg. The Powershell script will then add the corporate headshot to the correct person in Active Directory. The debut of Exchange 2010 and Outlook 2010 made the portrait from AD available in Exchange Global Address list. All out of sudden the new headshots are available in the Outlook clients to all employees in the company.
Corporate Headshots available in Exchange and Outlook
The thumbnails uploaded to Active Directory will also be visible for colleagues in Skype for Business:
Corporate Headshots as viewed in Skype for Business
AD-integrated thumbnails in Skype for Business will only be visible to internal users. Federated users will not have read access to the picture stored in Active Directory. In order to make your thumbnail portrait visible to federated partners you need to tweak your Skype for Business to allow pictures from a website. With this option available we can pick a portrait available on the Internet as a thumbnail photo in Skype for Business.
In order to have a streamlined distribution of the corporate headshots, we have created a website on the Skype for Business server with all headshots available in correct format. The website is populated with images from the same Powershell script populating AD with thumbnail photos. This will give all users a Skype for Business uniform corporate portrait visible to everyone - internally and externally!
Example of Skype for Business meeting where pictures of federated users are missing
3rd party systems
The Powershell script used for distribution of the corporate headshots can easily be customized to distribute pictures to other 3rd party systems. The following list contains examples of 3rd party systems where the powershell script has been used for picture distribution.
Trio Enterprise
Trio Enterprise has options to have corporate headshots for each individual person registered in Company Directory. Company Directory can be set to synchronize with Active Directory, but the thumbnail photo from AD can't be directly synced to Company Directory. By customizing the PowerShell script for distributing the corporate headshots, we have managed to incorporate Trio Enterprise into the automated picture distribution. Here are some examples of pictures as they appear in Trio Enterprise:
Corporate Headshot in Trio Enterprise Attendant
Corporate Headshot in Trio Enterprise Web Assistant
Corporate Headshot in Trio Enterprise Web Assistant
Web based solutions
The pictures has also been distributed to 3rd party web based solutions with information based on AD giving phone lists, employee lists, organization charts, doorsigns etc. These are handy tools for new coworkers in the company to match names and faces. Some screenshots just as an example:
Organization Chart with headshots
Department list with headshots
Title list with headshots
User information with headshot
Doorsign template with headshot
Contact Card VCF file
The best way to distribute your contact card in a digital way, is by use of VCF Contact Cards. These cards can in fact also contain a portrait. This will effectively distribute the new portraits and updated personal details to your contact persons outlook and mobile phones. The PowerShell script used to distribute the Corporate Headshots can also distribute pictures to be used in a VCF Contact Card routine. I have earlier described a routine for setting the Outlook Auto Signature based on details in AD. This has in some circumstances been extended to give a shortcut to an downloadable VCF file with appropriate updated contact details - included a fresh user portrait!.
Outlook AutoSignature with shortcut to updated VCF file
VCF file with updated details and corporate headshot
Windows 10 Profile Picture
Some fantasy and creative use of PowerShell and Group Policy can also automatically distribute the Corporate Headshots from AD as profile picture in Microsoft Windows 10.
Corporate Headshot as profile picture in Windows 10. ScreenLock background is also centrally managed.
Corporate Headshot picture in Windows 10
Office365
Microsoft Office 365 has Corporate Headshots heavily integrated in all services and modules. We have expanded the Powershell script to distribute the corporate headshots also to this platform. This gives the platform an extra social profile.
An example of corporate headshots in Delve from Microsoft Office 365
Corporate Headshots and other graphical branding through scripting
Scripting and customization of your standard products used by your employees on a day to day basis can take your branding interests to a higher level. This blog post has focused on corporate headshots. It could have been considerable longer if I did include other graphical branding possibilities available in your standard products in use at the office.
A security concern!
Please do remember - these are small steps helping you increase your security since it will give your services a branded look which differs from standard solutions!
I would love to help you with these concerns! Please comment if you have a good story, some needs or experience related to this topic!






.gif)