Showing posts with label Office365. Show all posts

Thursday, September 29, 2022

Branding your tenant and managed endpoints

A clear brand builds identity and affiliation. Microsoft 365 and Endpoint Manager has a rich set of tools for customizing your brand into the products. This will look nice and integrated, and it will help the end users detect security attacks. Let's take a deep dive into the possibilities associated with branding your tenant and endpoints!


A brand is a name, term, design, symbol or any other feature that distinguishes one company's good or service from those of other companies. Brands are used for recognition, creating values and identification. A brand is the sum of all expressions by which an entity (person, organization, company, business unit, city, nation, etc.) intends to be recognized.

With a workforce spread all over the modern hybrid workplace, it is more important than ever to spread the love of the company's brand. This blogpost will focus on how your brand can be incorporated to Microsoft 365 and all endpoints by Microsoft Endpoint Manager.

Monday, July 18, 2022

Disable "Do Not Send a Response" option in Outlook with MDM

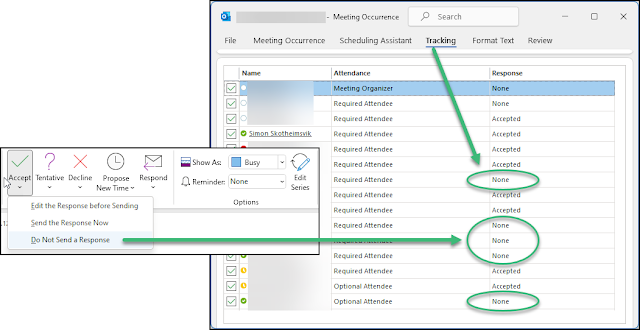
When users select the option to not send a response when accepting a meeting invite in Microsoft Outlook, their response is not visible for the invitee. This makes it troublesome to keep track of attendees for the meeting. This is why many organizations want to disable this option. 

If someone replies to a meeting invite by using the "Do Not Send a Response" option, the action is marked in the users calendar, but it will not reflect in the meeting tracking visible for invitees.


The problem has been present for a long time, and there has been some information available on how this can be solved by use of Group Policies in legacy Active Directory environments. Here's how to remove the option to not send a response on meeting invites using Configuration Policies in Microsoft Endpoint Manager and a Settings Catalog profile type.

Tuesday, April 19, 2022

Veeam Backup for M365 Automatic Reporting in PowerBI

Those of you which has read through the Microsoft services agreement might have noticed paragraph 6b where Microsoft recommends that you regularly backup your content and data that you store on the services using third-party apps and services. One example of such third party tool popular by managed service providers is the Veeam Backup for Microsoft 365. This blog post will explain how you can get automatic reporting on licenses and sizes used by this application.

Please note: This is not a sponsored post!

Data Deletion

Data deletion can occur when an attacker deletes your data, usually in a way that makes recovery difficult, if not impossible. A variant of this type of attack includes ransomware. With ransomware, an attacker compromises the network, encrypts data, and then demands a payment to get the key to decrypt the data. This may equate to data deletion since a successful extraction of payment often leads to more targeting by the attacker. Attacker motivations for data deletion covering the tracks of an attack, attempting to do irreparable harm to your business, or simply trying to spite you or your employees

Preventing data deletion

Other than the protection mechanisms you should employ to prevent account breach an elevation of privileges, your core prevention strategy should be to ensure you have sufficient redundancies built into your data management processes to minimize the impact of data deletion. Data in Microsoft 365 is made redundant for maximum availability by the service. However, it's still possible for an attacker to delete data from SharePoint sites and recycle bins, making it almost impossible to recover. There is also examples of bugs where data has been deleted from Teams and Sharepoint. Therefore, it's critical that you have a process for backing up mission critical data to offline stores - just like the Microsoft Services Agreement states.

Veeam Backup for Microsoft Office 365

Veeam Backup for Microsoft 365 is one application which can help eliminate the risk of losing access and control over your Office 365 data, including Exchange Online, SharePoint Online, OneDrive for Business and Microsoft Teams. This product is often used by managed service providers offering their services to customers. One challenge will be to automate a reporting solution showing the usage of the service related to license and storage on repositories.

Report automation

Niels Engelen has described a way to automatically send reports from Veeam by email. This is a simple approach to the standard functionality where PDF report will be sent by e-mail. It just didn't fit my expectations for reporting. 

PowerShell data harvesting

I have studied the Veeam Backup for Microsoft 365 PowerShell Reference and made a script counting all licenses, data usage and repository usage on a daily basis. This data is prepared in a JSON format and uploaded to an Azure Cosmos Database. The Azure Cosmos Database is quite inexpensive for this kind of usage. 

The following query will list all licensed users in a JSON format before uploading each record to the Cosmos database.
# Get VBO Licensed users, convert to JSON and upload to CosmosDB
$CosmosDBCollectionID = 'VeeamBackupLicenses'
$LicensedUser = Get-VBOLicensedUser

$output = foreach ($user in $LicensedUser) {
    $LastBackupDate = (($user.LastBackupDate).toString()).Split(" ")[0]
    $id = $([Guid]::NewGuid().ToString())
    $doc = [pscustomobject]@{
        id               = $id
        Username         = $user.UserName
        LastBackupDate   = $LastBackupDate
        Year             = (($LastBackupDate).toString()).Split(".")[2]
        Month            = (($LastBackupDate).toString()).Split(".")[1]
        LicenseState     = $user.LicenseState
        OrganizationName = $user.OrganizationName
    }
    $document = $doc | ConvertTo-json | Out-String
    # Writing data to CosmosDB
    New-CosmosDbDocument -Context $cosmosDbContext -CollectionId $CosmosDBCollectionID -DocumentBody $document -PartitionKey $id -Encoding UTF-8
}


The next query will get the usage pr. organization and upload this to a CosmosDB in JSON format:
# Get VBO Usage pr Organization, convert to JSON and upload to CosmosDB
$CosmosDBCollectionID = 'VeeamBackupUsage'
$Organizations = Get-VBOOrganization
$Date = get-date -Format "dd.MM.yyyy"

$UsageOutput = foreach ($Org in $Organizations) {
    $UsageData = Get-VBOUsageData -Organization $Org
    # Need to handle the fact that a customer can have data in several repositories
    foreach ($Usage in $UsageData) {
        $id = $([Guid]::NewGuid().ToString())
        $UsedSpaceGb = [MATH]::Round((($Usage.UsedSpace) / 1024 / 1024 / 1024), 1)
        $Udoc = [pscustomobject]@{
            id               = $id
            Date             = $Date
            RepositoryId     = $Usage.RepositoryId
            UsedSpaceB       = $Usage.UsedSpace
            UsedSpaceGB      = $UsedSpaceGb
            OrganizationName = $Usage.Organization.DisplayName
            OrganizationMSID = ($Usage.Organization.Id.Value).Split(":")[0]
        }
        $Udocument = $Udoc | ConvertTo-json | Out-String
        # Writing data to CosmosDB
        New-CosmosDbDocument -Context $cosmosDbContext -CollectionId $CosmosDBCollectionID -DocumentBody $Udocument -PartitionKey $id -Encoding UTF-8
    }
}

The third query will get information about the repositories defined in Veeam Backup for Microsoft 365 and upload this in JSON format to the Cosmos Database. The original data values from the queries are in bytes format.
# Get VBO Repositories, convert to JSON and upload to CosmosDB
$CosmosDBCollectionID = 'VeeamBackupRepositories'
$Repositories = Get-VBORepository
$Date = get-date -Format "dd.MM.yyyy"

$RepositoryOutput = foreach ($Repo in $Repositories) {
    $id = $([Guid]::NewGuid().ToString())
    $RepoCapacityTb = [MATH]::Round((($Repo.Capacity) / 1024 / 1024 / 1024 / 1024), 1)
    $RepoFreeSpaceTb = [MATH]::Round((($Repo.FreeSpace) / 1024 / 1024 / 1024 / 1024), 1)
    $Rdoc = [pscustomobject]@{
        id                    = $id
        Date                  = $Date
        RepositoryId          = $Repo.Id.Guid
        RepoName              = $Repo.Name
        RepoPath              = $Repo.Path
        RepoCapacityB         = $Repo.Capacity
        RepoCapacityTB        = $RepoCapacityTb
        RepoFreeSpaceB        = $Repo.FreeSpace
        RepoFreeSpaceTB       = $RepoFreeSpaceTb
        RepoRetentionType     = $Repo.RetentionType
        RepoRetentionPeriod   = $Repo.RetentionPeriod
        RepoRetentionFreqType = $Repo.RetentionFrequencyType
    }
    $Rdocument = $Rdoc | ConvertTo-json | Out-String
    # Writing data to CosmosDB
    New-CosmosDbDocument -Context $cosmosDbContext -CollectionId $CosmosDBCollectionID -DocumentBody $Rdocument -PartitionKey $id -Encoding UTF-8
}

These different Powershell parts are coordinated and scheduled to run as powershell scripts on a regular basis on the Veeam backup servers.
  <Actions Context="Author">
    <Exec>
      <Command>C:\Windows\System32\WindowsPowerShell\v1.0\powershell.exe</Command>
      <Arguments>-ExecutionPolicy bypass -file "C:\Simon\CountVeeam365LicensesDailyToPowerBI.ps1"</Arguments>
    </Exec>
  </Actions>

PowerBI data analyzis

Using PowerBI Desktop, it is easy to connect to the Cosmos Database. With the data loaded into Microsoft PowerBI you can do further manipulations of the data using DAX queries. One example could be to calculate the difference between capacity and free space for the repositories in order to get the used space pr. repository. This could be done like this which will return a separate column with the result ready to use in the report:
RepoUsedSpaceB = CALCULATE(SUM(VeeamRepositories[RepoCapacityB]))-CALCULATE(SUM(VeeamRepositories[RepoFreeSpaceB]))

I have also made a calculation of consumed GB pr user in each company. This is done in two steps. First I calculate number of users pr. company:
AntallBrukere = DISTINCTCOUNT(VeeamLisenser[Bruker])

Then I calculate consumed GB pr user in the company:
GBprBruker = SUM(VeeamUsage[UsedSpaceGB])/Kalkulasjonstabell[AntallBrukere]

Using Power BI we can easily create several reports to visualize the status of the service.

Example of monthly report of all companies and users protected by Veeam 365 Backup which can be the basis for invoicing where this is based on the number of users in the system pr. company.


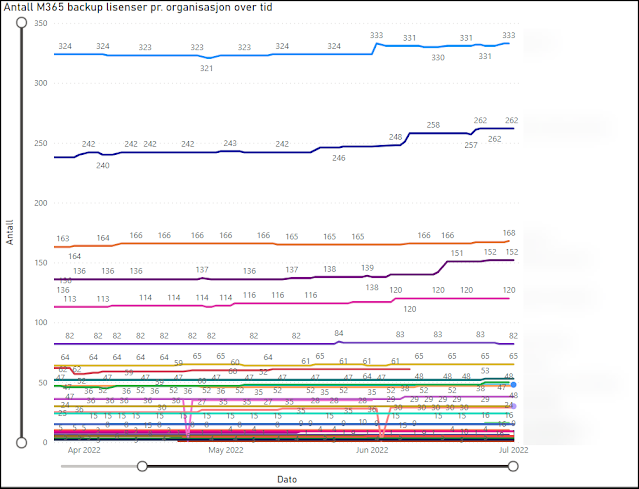
Example of historical development of backup up users pr. company by Veeam 365 backup.

Example of gigabyte compared to number of users pr. company protected by Veeam 365 backup.

Example of usage of the calculated column for GB pr User. Infinity comes from stored data for customers which have terminated their contract where data still exists. This has been removed from the graph with a visuals filter displaying only companies with more than 0 users.


Example of report for repositories with forecast in the Veeam 365 backup service.

This gives a fully automated always up to date reporting solution showing current usage and historical development related to the provided service, license usage and storage consumptions. The reports can easily be filtered by clicking on the values and graphs giving the consumer of the reports the ability to select the desired view. 


The animation is blured to protect the data exposed in the report

If you upload your PowerBI report to the online PowerBI service, you can set the dataset to automatically update directly from the Cosmos Database. This will allow for online consumption of the report from all your devices. One idea could be to add it as a tab in a suitable team channel in Microsoft Teams giving easy access for everyone interested in the topic.

I do believe someone could have interest in the PowerBI Report file, but unfortunately this can't be shared because my reports contains PII data. 

Conclusion

I hope this could inspire someone to dive into data capturing and report building. If you have thoughts, ideas, comments or ideas after reading this far, please add a comment.


Tuesday, October 30, 2018

Booking of Exchange room resources in Teams

We are experiencing some problems related to booking of exchange room resources in Microsoft Teams. Some meetings are not booked in the Exchange room resource calendar which might result in problem with double-booking of the physical room and problems connecting to the meeting from a Skype Room System.

A Teams meeting can be booked from both Outlook Calendar and from the Microsoft Teams client. If you are booking the meeting in Outlook Calendar and the Teams meeting plug in, you can’t select a corresponding Teams Channel for the meeting. It is therefor preferable to use the meetings tab in the Teams Client for booking the Teams meeting. In order to have the Exchange Room Resources available in Microsoft Teams, you have to add the Exchange resources to distribution groups.

I have spent some time researching the problem with missing bookings from Teams meetings in Exchange room resources. The research made the following findings:

  • If the room resource is selected before Team/Channel is selected, the room is not booked in the Exchange calendar for the room resource.
  • If a Teams meeting with a meeting room is edited afterwards, the Exchange room calendar loses its booking.

I guess this will be fixed soon on the Microsoft Teams client. Until then, we have to make sure to do the booking variables correctly and in the correct sequence:
Choose Channel before meeting room
If you have any experience related to this issue, I would be glad to hear!


Tuesday, March 27, 2018

Outlook App erstatter mail på mobil og nettbrett

Det finnes omtrent like mange applikasjoner for epost som det finnes tre i en middels norsk barskog. De adresserer alle et område som for mange oppfattes som personlig og hvor de fleste har forskjellige arbeidsvaner. For få år siden var det utenkelig at Microsoft skulle slippe Outlook for Android og iOS. Kan det nå tenkes at dette i dag er eneste riktige standard for jobbmail?

Epost applikasjoner er en morsom liten greie. På samme måte som nettlesere har vi benyttet de i alle evighet. Likevel er kravene og behovene annerledes i dag enn i 1999. Teknologien er mye lik, men brukeropplevelsen og kravet til sikkerhet har utviklet seg enormt.

Outlook uavhengig av plattform
I bedriftsammenheng har Microsoft Exchange vært dominerende som epost løsning, og gjennom Exchange Active Sync har vi lenge fått epost, kalender og kontakter inn på smarttelefonen. Dette har utviklet seg stadig. Serverplattformen har for de fleste etterhvert flyttet ut i Microsoft sin skyløsning, samtidig som de ansatte i større grad enn før ønsker tilgang fra personlige enheter. Dette øker nødvendigheten av sikkerhet rundt løsningen, noe som igjen setter premisser for hvilke epost applikasjoner som er fornuftig å benytte. Her seiler Microsoft Outlook opp som den beste og sikreste klienten for Android og iOS.

Ved hjelp av mekanismer i Microsoft sin skyløsning kan nå bedriften og brukernes kommunikasjon og data sikres. Dette krever dog at det er Microsoft sine egne applikasjoner som benyttes også på mobiler og nettbrett. Sikkerheten kan da ivaretas mellom Outlook, Word, Excel, OneDrive for Business, OneNote, Teams og andre applikasjoner fra Microsoft. Tilgangen mellom klient og server sikres da samtidig som dataene i applikasjone også sikres at de ikke kommer på avveie. Inntil nylig var epostadresse og passord det eneste man trengte for å sette opp epost på mobiltelefonen. Nå kan og vil det settes strengere krav for tilgangen til bedriftens data - dersom du vil ha epost på din telefon må reglene følges.

Outlook App tilpassinger

Outlook App på Android og iOS er relativt fersk, spesielt sammenlignet med Outlook på PC som ble lansert i 1997. I starten var Outlook app svært mangelfull, men den har nå utviklet seg til å bli den beste applikasjonen man kan ha for å betjene epost og kalender på mobiltelefonen. I utgangspunktet er Outlook App god. Jeg har likevel funnet at den krever noen enkle tilpasninger for å bli perfekt for meg. Heldigvis lar den seg tilpasse, og her kommer en liste over de endringer jeg har satt opp for meg selv:

Tilpassingene gjøres fra Settings menyen inne i Outlook.
Trykk oppe i venstre hjørne av Outlook for å få opp mappelisten med snarvei til Settings.
Bildene her er fra Android, men finnes også for iOS.
(trykk for større bilde)

Jeg pleier å tilpasse alternativene for å sveipe i Innboksen til min behov.
(trykk for større bilde)

Kan her velge hva som skjer når man sveiper til høgre og venstre.
Jeg har valgt at markere som lest/ulest ved sveiping til høgre.
Til venstre har jeg valgt å slette eposter.
(Trykk for større bilde)

Jeg har ellers satt opp en personlig autosignatur i Outlook App omtrent som i Outlook på PC.
Les forøvrig egen artikkel rundt autosignatur i Outlook på PC.
(Trykk for større bilde)

Autosignatur kopierte jeg med meg fra en mail sendt fra PC funnet i sendte elementer.
Den er noe tilpasset ettersom jeg ikke har rik tekstformatering her.
(Trykk for større bilde)


Organisering og visning av eposter oppleves bedre om man fjerner haken for "Organiser etter tråd". Dette gjelder spesielt opplevelsen ved å svare på epost.
(Trykk for større bilde)


Under Innstillinger - Kalender kan du sette på visning av ukenumre i Outlook kalenderen.


For å få med kontakter fra Outlook og inn i telefonens kontakter må selve kontoen tilpasses.
Dette forutsetter at denne muligheten ikke er låst ned sentralt.
(Trykk for større bilde)

Velg nå å synkronisere kontakter fra Outlook og inn på enheten. Ved bruk av Android Work Profile vil disse kontaktene nå legges i kontakter tilhørende den profilen. Dialoger fra disse kontaktene (sms etc) vil da bli markert som jobbdialoger.
(Trykk for større bilde)

På iOS har jeg valgt å legge inn Outlook, Teams og OneNote som valg under dele-knappen.
Dette settes enkelt opp med siste knappen på linjen.
(Trykk for større bilde)
Det kan være hensiktsmessig å fjerne visning av Outlook elementer på låstskjermen.
Her er eksempel fra iOS hvor man under Innstillinger - Varslinger - Outlook fjerne hake for å vise varsler på låst skjerm.
(Trykk for større bilde)

Kalenderbruk

Etter innføringen av Intune for administrasjon av mobile enheter og sikring av bedrifters data er det mange som mister kalenderinnslagene fra Outlook Kalender inn mot den innebygde kalenderen i iOS og Android. Dette kommer i tilfelle som en følge av at Intune er satt opp til å begrense Exchange synkronisering kun mot applikasjoner som lar seg administrere. Appen Microsoft Outlook er et eksempel på dette. Kalenderinnslagene fra bedriftskalenderen vil derfor kun være tilgjengelig gjennom applikasjonen Microsoft Outlook.

Det kan derfor være like greit å venne seg til å benytte kalenderen i Microsoft Outlook ved innføring av Intune. Bruk kalenderen til å opprette nye avtaler og følge opp agendaen din på jobb. Husk du kan tilpasse visningen.
Velg Kalenderdelen av Outlook Appen og tilpass visningen.
Prøv også kalenderen på nettbrettet i liggende visning.
(Trykk for større bilde)

Private kalendere inn i Outlook Kalender

Det har nå kommet mulighet for å legge de private kalenderne inne i Outlook appen (Google kalender, iTunes kalender og øvrige kalendere som er definert opp på enheten). Dette gjør at man da får en samlet visning over avtaler på jobb og privat direkte i Outlook kalender. Når aktuelle kalendere er lagt inn, kan man enklet velg hvilke som skal vises i menyen. Det blir da også mulig å opprette nye avtaler i de private kalenderne gjennom Outlook appen. Med denne utvidelsen har jeg nå min jobb og privat kalender tilgjengelig i Outlook. Jeg har tilgang til interessante delte kalendere på jobb og jeg har tilgang til familiens private Gmail kalendere direkte i Outlook kalender.
Trykk på "+" knappen inne på menyen i Outlook Kalender og du får tilgang til å legge til andre kalendere på enheten, delte kalendere fra Exchange, Gmail kalendere, iCloud kalendere med mere.


Jeg håper du finner noen av disse tipsene interessante. Har du andre tilpasninger du selv pleier å gjøre er jeg glad om du tipser meg om disse - legg gjerne igjen en kommentar under her. Ønsker du hjelp til å få kontroll over bedriftens data som bor ute på de ansattes mobiltelefoner kan vi i Serit bistå med dette - ta gjerne kontakt for å høre mer om mulighetene som finnes for å sikre at brukerne har riktige verktøy på sine mobiler og at dataene i verktøyene forblir sikre.

Monday, July 10, 2017

Corporate Headshots - Social Media for Business

First impressions will always be important, but now that we conduct so many of our initial interactions online, virtual personal branding has become as important as the firm handshake once was in introducing yourself to the world. Hence a corporate headshot is an opportunity to portray a brand image to potential customers.

In business we spend a lot of money on branding across logos, websites, literature, packaging and premises. Is the photographic representation of you and your coworkers the place to scrimp on branding? Probably not. Whether you are posting your headshot on you Companys website, or want to post it on social media pages, you are always representing your business in one way or another. A professional headshot will put confidence into you business and make your clients more willing to deal with you.

Think about it for a moment - if you were searching for a new supplier and found that a certain company was a very viable supplier, but the corporate headshots had an unprofessional style - would you be willing to deal with this company? If you want to get the most out of your digital presence, a professional corporate headshot will allow you and your colleges to achieve a good appearance.

Getting the most from your head shot

If you decide to make corporate headshots of you and your company, you will have to deal with a lot of questions related to dress codes, style of the images etc. You need to book a photographer and put up a schedule for your co-workers to get photographed.
Me doing corporate headshots of  a company

Pictures received - now what?

Once the photo session is finished you will receive a portfolio of pictures from the photographer. Now you need a plan how to distribute and use these pictures in order to give the best return of Investment.
Corporate Headshost received - time to distribute and use the pictures
Social Media has been a large consumer of headshots for a long time. We have also seen headshots as impersonators in corporate software for a while. The challenge now will be to utilize the new portfolio of headshots over the wide array of software og systems supporting personal portraits.

Active Directory, Exchange and Skype for Business

Portraits can be added to each user account in Active Directory as a thumbnail. There are several tools available for this operation out on the wild internet. We have preferred a PowerShell script to deal with this operation. Pictures are being adjusted and exported to a folder in the format of sAMAccountName.jpg. The Powershell script will then add the corporate headshot to the correct person in Active Directory. The debut of Exchange 2010 and Outlook 2010 made the portrait from AD available in Exchange Global Address list. All out of sudden the new headshots are available in the Outlook clients to all employees in the company.
Corporate Headshots available in Exchange and Outlook
The thumbnails uploaded to Active Directory will also be visible for colleagues in Skype for Business:
Corporate Headshots as viewed in Skype for Business
AD-integrated thumbnails in Skype for Business will only be visible to internal users. Federated users will not have read access to the picture stored in Active Directory. In order to make your thumbnail portrait visible to federated partners you need to tweak your Skype for Business to allow pictures from a website. With this option available we can pick a portrait available on the Internet as a thumbnail photo in Skype for Business.
In order to have a streamlined distribution of the corporate headshots, we have created a website on the Skype for Business server with all headshots available in correct format. The website is populated with images from the same Powershell script populating AD with thumbnail photos. This will give all users a Skype for Business uniform corporate portrait visible to everyone - internally and externally!
Example of Skype for Business meeting where pictures of federated users are missing

3rd party systems

The Powershell script used for distribution of the corporate headshots can easily be customized to distribute pictures to other 3rd party systems. The following list contains examples of 3rd party systems where the powershell script has been used for picture distribution.

Trio Enterprise

Trio Enterprise has options to have corporate headshots for each individual person registered in Company Directory. Company Directory can be set to synchronize with Active Directory, but the thumbnail photo from AD can't be directly synced to Company Directory. By customizing the PowerShell script for distributing the corporate headshots, we have managed to incorporate Trio Enterprise into the automated picture distribution. Here are some examples of pictures as they appear in Trio Enterprise:
Corporate Headshot in Trio Enterprise Attendant

Corporate Headshot in Trio Enterprise Web Assistant

Corporate Headshot in Trio Enterprise Web Assistant

Web based solutions

The pictures has also been distributed to 3rd party web based solutions with information based on AD giving phone lists, employee lists, organization charts, doorsigns etc. These are handy tools for new coworkers in the company to match names and faces. Some screenshots just as an example:

Organization Chart with headshots

Department list with headshots

Title list with headshots

User information with headshot

Doorsign template with headshot

Contact Card VCF file

The best way to distribute your contact card in a digital way, is by use of VCF Contact Cards. These cards can in fact also contain a portrait. This will effectively distribute the new portraits and updated personal details to your contact persons outlook and mobile phones. The PowerShell script used to distribute the Corporate Headshots can also distribute pictures to be used in a VCF Contact Card routine. I have earlier described a routine for setting the Outlook Auto Signature based on details in AD. This has in some circumstances been extended to give a shortcut to an downloadable VCF file with appropriate updated contact details - included a fresh user portrait!.
Outlook AutoSignature with shortcut to updated VCF file


VCF file with updated details and corporate headshot

Windows 10 Profile Picture

Some fantasy and creative use of PowerShell and Group Policy can also automatically distribute the Corporate Headshots from AD as profile picture in Microsoft Windows 10.
Corporate Headshot as profile picture in Windows 10. ScreenLock background is also centrally managed.

Corporate Headshot picture in Windows 10

Office365

Microsoft Office 365 has Corporate Headshots heavily integrated in all services and modules. We have expanded the Powershell script to distribute the corporate headshots also to this platform. This gives the platform an extra social profile.
An example of corporate headshots in Delve from Microsoft Office 365

Corporate Headshots and other graphical branding through scripting

Scripting and customization of your standard products used by your employees on a day to day basis can take your branding interests to a higher level. This blog post has focused on corporate headshots. It could have been considerable longer if I did include other graphical branding possibilities available in your standard products in use at the office. 

A security concern!

Please do remember - these are small steps helping you increase your security since it will give your services a branded look which differs from standard solutions!

I would love to help you with these concerns! Please comment if you have a good story, some needs or experience related to this topic!


Thursday, April 6, 2017

Sharepoint kontakter inn i Trio

Microsoft Sharepoint er mye benyttet for lagring og sortering av dokumentasjon og informasjon i bedrifter. Her blir også kontaktinformasjon sortert og kategorisert i lister. Med løsninger som for eksempel Invo SPSolution blir det enkelt å samle kontaktinformasjon i hele firmaet. Gjenbruk av denne informasjonen i Trio vil derfor være en interessant tanke.

Adresseliste for søk i Trio
Trio har mulighet for å sette opp ekstra adresselister fra tredjepart systemer. SharePoint har jo fine lister som er enkle og gode å vedlikeholde og gjenbruke på tvers av løsningen - spesielt om man har tredjeparts løsninger som den nevnt over her hvor informasjonshenting og knytning mot kontakter skjer fortløpende fra alle ansattes mailbokser og dokumenter.

Her er et eksempel på en liste i SharePoint:
Kontaktregister i Invo SPSolution
Jeg har utviklet en rutine for å hente ut disse kontaktene fra Sharepoint og legge de til rette i en egen adresseliste i Trio Enterprise. Der hvor jeg har satt dette i drift gjør jeg en synkronisering hver natt. På den måten blir informasjonen fra Sharepoint lister enkelt tilgjengelig for søk direkte i Trio klienten i egen adresseliste. Tastatursnarveien for å veksle mellom adresselister i Trio er <shift>+<alt>+<piltaster>.
SPS Contacts er opprettet som egen adresseliste i Trio med søkemulighet i kontakter hentet fra SharePoint

Navneoppslag på innkommende samtaler
Dersom det er interessant å ha navneoppslag fra Sharepoint kontaktene på innkommende anrop til Trio må disse i dag importeres til Company Directory (CD). Det er en del utfordringer knyttet til dette. Dette går på rutiner rundt selve synkroniseringen samt at det også medfører en liten kostnad pr. innslag i CD.

Jeg har tidligere skrevet om Trio sine muligheter for å gjøre navneoppslag direkte mot Eniro og 1881. Når man ser hvor tilrettelagt og enket det er å koble seg opp mot SharePoint lister fra for eksempel Microsoft Excel, Microsoft PowerBI, Powershell og annet ser jeg det som meget sannsynlig at det på enkelt vis også bør la seg gjøre å koble seg opp direkte mot Sharepoint lister direkte fra Trio Enterprise. Det vil dog kreve noe utvikling fra Enghouse Interactive.

Dersom dette blir realisert ville man kunne benyttet data fra Sharepoint listene direkte i Trio Enterprise på samme spennende vis som ved navneoppslagene mot Eniro, 1881 og for så vidt også Microsoft Dynamics CRM. Dette vil da gi en enorm merverdi av SharePoint og Trio Enterprise. Jeg håper og tror derfor at dette er en funksjon som vil komme.

Legg gjerne igjen en kommentar på hva du tenker om å integrere informasjon fra Sharepoint inn i Trio Enterprise.


Friday, September 30, 2016

MSIgnite 2016, Day5

A short day at the conference left some time to explore the city. The sessions I attended was of uniform Ignite quality.

My first session today was out of my traditional track - it was Lonya French talking about "Create meaningful stories in an instant with Office Sway". It was time to explore something new, and Sway seemed to be an interesting product to include in my everyday life at work and on private. Sway is a new Microsoft Office app that lets you easily create presentations, reports, and stories to share with the world. In Sway I can concentrate on the content and let Sway take care of the design. Looking forward to explore this further.

Lonya starting her session


My second session of my last day at Ignite 2016 was held by Korneel Bullens known from earlier. Today he also got company from Sunie Sutjahjo. The sessions topic was "Deploy ExpressRoute for Skype in Microsoft Office 365". This session was enlightening and structured related to the subject which InFact could be relatively floating. The speakers did manage to describe the ExpressRoute product in a perfect manner. The important thing was to get an understanding on when we need Express Route, and when we don't need an Express Route. We did also get third party applications to know.
The presenters are getting ready.
One slide describing the Express Route
Korneel described perfectly when a Express Route would gain the network performance


My last session for the conference was held by my Norwegian acquaintance Lasse Nordvik Wedø on the topic "Configure Skype for Business Cloud Connector Edition with your SBC". The session did have a good flow thanks Lasse's good preparations. We did have video recordings of the demos and the presentation did continuously update with corresponding twitter posts. Great ninja skills!
Lasse starting his session at Ignite 2016
Lasse was very exact in his prerecorded demoes on the Sonus SBC's 
After the last session was finished, it was time to pick my luggage and have my last Ignite Lunch... this year.
Orlando announced as next years Ignite location
Now I had some time to explore the city before my flight home.
Relaxing in the sun outside of Georgia World Conference Center
Changing to hotel downtown for my last night
Visiting the Coca-Cola world museum (Coca-Cola origins from Atlanta, GA)
Had a great dinner at Hard Rock Cafe Atlanta
Me with a motorbike found at Hard Rock Cafe Atlanta that Elvis Presley bought the year I was born.

Thanks to Microsoft for being a great host during this week in Atlanta. Thanks to Serit for allowing me to attend to the Microsoft Ignite 2016 conference. Thanks to my wife Else Marie that runs our home with our three lovely kids while I have been travelling abroad. Much appreciated!