Senior Cloud Consultant at CloudWay - Microsoft 365 specialist.
Highly certified within Microsoft 365, Intune, EMS, Azure, Teams, Cyber Security and more.
Versatile background, good documentation, technical flair, keen interest and ability to improvise are good ingredients in projects I’m involved in.
The Modern Workplace supports the demand to work from anywhere. There are companies today operating mainly from home offices. How much technology is acceptable to use for hiding in the home office?
I have been experimenting with knowledge from the photography business and technology from youtuber's in the gaming industry to enrich my Microsoft Teams meetings from my home office. The goal has been to have high quality video conferencing with a simplified and quick operation. This attempt is presented in the following low cost one shot video.
Technical rundown
There has been some questions related to this setup on Twitter, so I decided to make a technical rundown of the setup.
Lights
In order to have a good picture with studio portrait quality, I need good lights. After exploring different options I ended up ordering an Elgato Key Light Air as my main light. This choice was a combination of price and lamp design and features. This lamp has a great stand, it connects wirelessly to my computer, it is cool and brightness and color can easily be controlled.
In addition I am using some Phillips Hue light sources. I have one color light source behind my monitors for ambience light, and in the ceiling I have a ledbar from IKEA which has been equipped with Hue GU10 white ambience light bulbs. I have created some scenes in the Hue system for my video conferencing setup. Two of the GU10 lights in the ceiling are pointed at the green screen trying to make an even light all over the screen. These lights has a cold temperature set in order to make the color of the green screen stand out. I have also pointed one of the GU10 hue lights towards my head to make a hair light for background separation. This light as a warmer tone set. I don't think I need any more fill lights for my current setup.
Workplace with hue ambient light
Workplace with hue ambient light and key light
Hue fill lights for green screen and hair light for background separation
Hue ambient light behind monitor
The Hue scene used for videoconferencing.
Green screen
I have considered several types of green screens. Based on my experiences in studio photography I wanted a solid type to avoid folds which in turn can be troublesome related to lighting and chroma key processing. I had my eyes on the roll-up versions from Elgato and Nebula. These are around 148 cm wide, and they seem easy to fold up an down. These can easily be found cheap on second hand webshops since there are a lot of fading youtube stars out there. I read some reviews and found them to require some floor space. They could in some circumstances also be wider. Some where experimenting with two of these to get enough width on the background - this is kind of tricky in order to get a perfect faded overlapping background.
I finally found the 190 cm wide Elgato Green Screen MT which can be easily mounted in the ceiling. This one will cover my entire bookshelf without taking up any space on the floor. I had some concerns related to the weight when mounted in the ceiling, but in practice this was not a problem. Unfortunately no Elgato Green Screen MT was found on second hand marketplaces, but it wasn't the most expensive one. When bought as new, I also got first class packaging and shipping. I certainly do not regret this choice.
Bookshelf and guitars with Green Screen MT rolled up in the ceiling
Bookshelf and guitars hidden behind Green Screen MT rolled down from the ceiling
Detail from the mounting of the Green Screen MT in the ceiling
Green Screen processing
In order to do a chroma key processing of the green screen, I am using the OBS Studio freeware. This is a software primarily made for streaming to Twitch, YouTube and other services. In this project I am using the VirtualCam function found in the Tools menu. This sends the output mix from OBS to Windows as a virtual camera driver and can therefore be selected as source in Microsoft Teams. The VirtualCam has been set to AutoStart.
Configuration of the VirtualCam in OBS
OBS-Camera selected as Camera in Teams - Settings - Devices - Camera
In OBS I have configured different scenes and scene transitions. Each scene can consist of a mix of several sources, including physical cameras attached to the computer, images, media sources and more. As a webcam I am currently using a Logi HD Pro WebCam C920. Inside OBS I have added a Chroma Key effect filter to this camera source in order to make a transparent background from the green screen. This combined with some environmental photos can make some exciting scenes. The OBS software has a lot of advanced opportunities, and you can easily find information and inspiration on this on YouTube.
1: Scenes, 2: Sources used in scenes, 3: Scene transitions, 4: Filters used on sources in scene
1: Add the Chroma Key filter, 2: Adjust the different variables, 3: Pay attention to the edge transitions
Filters
OBS has a rich pallette of options and third party plugins. One great valueadd to OBS studio is the StreamFX pluging which has a couple of great filters to enrich your setup. Alpha Gaming is giving a nice overview of this in his YouTube channel. I use the Blur filter from this package to add a small amount of blur on my background image. This technique can be used to imitate a picture with a shallow depth of view often seen by using DSLR's with pricy optics connected through Elgato Cam Link.
StreamFX Blur plugin applied to my background image
Props
When working on the different backgrounds, it is allways funny and effective to have props to put on your self in order to enhance the effect. A couple of examples in the following images.
Having a good time at my cottage
Having a good time at my home office, aka "jammekontor"
Having a rough time out in the field
Control Panel
In order to operate these technologies quick and easy, I am using a Stream Deck from Elgato. This system with all of its plugins has innumerable opportunities regarding automation and control. I have created many functions that support me throughout the day in the office.
Elgato Stream Deck located under my monitors
In order to easily do a Microsoft Teams meeting, I have set up a Multi Action button with 10 actionpoints [1: Launch OBS Studio, 2: Pause Spotify, 3: Set Hue scene for videoconferencing, 4: Turn on KeyLight, 5: Set Key Light temperature, 6: Set Key Light brightness, 7: Select OBS Scene, 8: Move Microsoft Teams to full screen, 9: Delay for 3s 10: Go to Calendar in Teams].
Configuration of the Multi Action button for starting a Teams meeting
Actions included in the Multi Action button for starting a Microsoft Teams meeting
In the same way I have created a Multi Action button with 4 actions to use when ending a Micreosoft Teams meeting [1: Play Spotify, 2: Set Hue scene for normal office work, 3: Turn off Key Light, 4: Minimize Microsoft Teams 4: End OBS Studio]
Actions included in the Multi Action button for ending a Microsoft Teams meeting
During a Teams meeting I have found it handy to have some special actions available. These are located in a separate folder containing a new set of buttons. Today I am using these to switch between the different scenes in OBS. These scenes includes different backgrounds, screensharing with talking head etc. I have also made a button for muting the microphone.
Stream Deck with OBS Scene controls and Mic mute
OBS Scenes with corresponding buttons for toggling sources on and off
Teams meeting with OBS VirtualCam
Teams meeting with OBS VirtualCam and Background Blur in Microsoft Teams
Teams meeting with OBS Scene in with screen sharing and talking head
The talking head challenge
I do experience some blured image quality on screensharing through OBS Virtual Camera plugin to Microsoft Teams meeting. I have tried to figure this out without any success yet. In a regular Teams meeting with VirtualCam, I don't think screensharing through OBS and VirtualCam is a good idea.
I have found a working setup for sharing your screen with a talking head directly to a Teams meeting. This requires multiple monitors. In my example I have a 3 monitor setup. This setup will give sufficient quality on the content shared into the meeting.
Monitor#1 is used as a stage, running OBS in fullscreen projection. I have a scene with content from Monitor#2 and a talking head overlay. I will share Monitor#1 into the Teams meeting.
Monitor#2 will be the workspace for content shared to the meeting. All content on this monitor will be shared to the meeting (powerpoints etc). A pro tip would be to place the cam and the workspace monitor in such a way that your head is looking inbound to the monitor in the shared window when working.
Monitor#3 is my Teams management monitor used to control the Teams meeting, OBS settings etc. This should be the main monitor for popups etc.
Three monitor setup for sharing screen with talking head into Teams
Right click in the preview and select Fullscreen Projector
Stream Timer
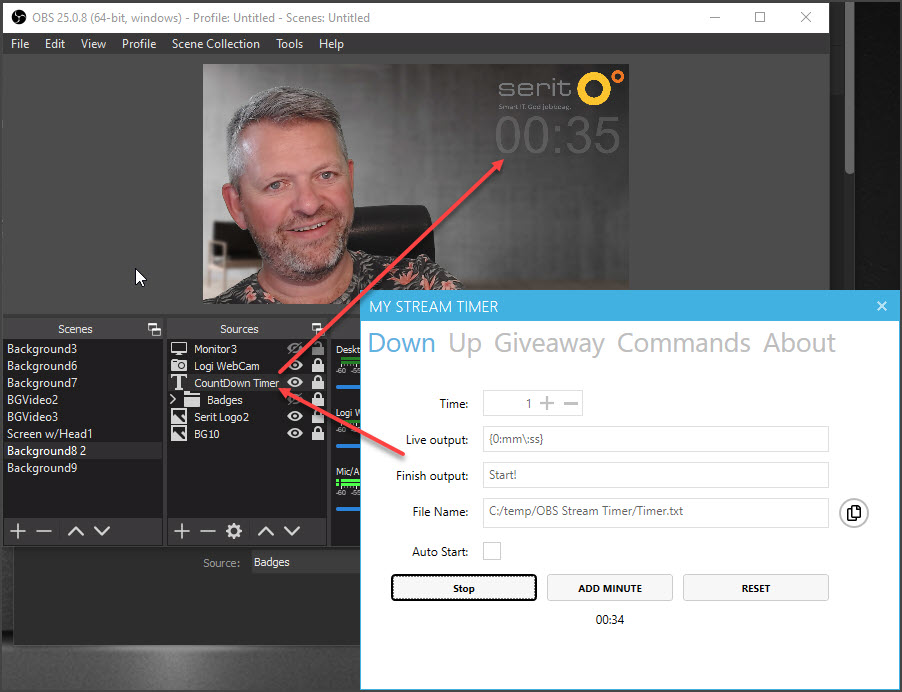
In some cases, a counter is desirable. This is often done with the help of a third party software updating a txt file which is added as a text layer in OBS. There are many free providers, some simple while others are more advanced. One example is http://www.mystreamtimer.com/ which can do both count down and count up in addition to have a leading text and a separate ending text. This can even be triggered directly from Stream Deck! Another simple one is the free Countdown Timer v2.0.
I got challenged by Ståle Hansen to include his Pomodoro powershell script into the Stream Deck. This has been testet and found Ok. I had some initial problems when using the "advanced launcher" plugin loading "C:\Windows\System32\WindowsPowerShell\v1.0\powershell.exe -file Start-SimplePomodoro.ps1". This powershell session didn't find the "presentationsettings" command. I had to use the "Super Macro" plugin instead. Now I have a separate button on my Stream Deck for launching 20 minutes of focus with no distractions.
Pomodoro powershell added as a button in my Stream Deck.
Alternative Pomodoro routine created with actions in Stream Deck
Embrava Busy Light
After the korona virus breakout, I have had my house full of three kids since the norwegian schools and kindergardens where closed. In order to let the kids know my working status at the home office, I have extended my home office setup with an Embrava Blynclight. This light indicates when I am "on air". This gives a better experience to my calls and meetings run from the home office during this pandemy.
Busy light on my monitor before it was moved next to the door leading to the home office.
PS! After a quick computer reset (windows autopilot), I had a problem connecting the blynclight to Microsoft Teams. This got solved after installing the Skype for Business client (the Office installation came without SFB client which I needed for customer support). Embrava support has investigated this issue and found that the Office 365 installation suite some times corrupting the registry keys required for Office Chat API interface. If such registry keys are corrupted then the Office Chat API interface won't work. A re-install or repair of the Office installation are often fixing this issue. In my case, the installation of the Skype for Business Client did. Embrava is working on a new driver version connecting directly to the Microsoft Teams server in order to get arround this problem. My guess is that they will use the Microsoft Graph API.
Snap Camera
Snapchat has lauched the Snap Camera application for Windows and MAC, bringing the magic of lenses to the video chats on PC & Mac. This can be used directly into Teams, and it can also be included in the OBS Studio. Could be kind of funny in some situations, but mostly annoying. It is also annoying that Snap Camera requires exclusive access to the webcams on your computer.
Webcamera as source
In the new Windows 10 2004 update (build 18995), it is possible for users to associate network cameras to their PC, enabling photo capture and streaming of video in camera applications. Currently Windows only supports ONVIF Profile S compliant cameras*, which are standards-compliant network cameras optimized for real-time streaming video capture. Windows provides support for discovery, pairing, configuration and streaming via WinRT APIs. These settings are described in this website. I can't wait to use a live webcamera as a source in my OBS setup!
Logitech Capture
Logitech Capture is an alternative software for managing multiple content, talking head etc. I have done some small tests, but it will not replace my usage of OBS studio. It does not integrate into the Elgato Setup, and the chroma key functions are poor compared to OBS.
Testing Logitech Capture.
Teams Customized Backgrounds
Microsoft is rolling out customized backgrounds as part of the native Teams experience. This means you now can replace the background directly in Microsoft Teams. You will find this option as part of the background blur in your Teams client. This is a nice lowcost feature, but it does not compare to a full green screen setup, and all the features you have in OBS studio - for instance add a background video.
Microsoft will sooon release the option to upload your personal images. You can however do this manually by copying your photos to the following folder: %APPDATA%\Microsoft\Teams\Backgrounds\Uploads\
Select background blur and pick your preferred background.
I have added a screenshot of my normal background with me present. Now I can walk away from the meeting but still be present :)
Use with other video systems
I have used this OBS Studio setup with the virtual camera plugin with other video systems as well - even Skype for Business. This proves that this setup is universal to all systems utilizing a webcamera on the computer.
End notes
Is this acceptable use of technology or is it overkill? Is this something you could imagine in your office or home office? Microsoft has announced a customized background feature in Microsoft Teams comming later this year. Could it be a good idea to paint a wall in your office green and install a key light for better quality during Microsoft Teams Meetings?
We have migrated from Skype for Business to Teams with phone integration. This means all our communication needs are covered by Microsoft Teams. Occasionally we perform user support through Teamviewer for remote control. Lately we have experienced that we have lost the sound of our Teams calling participants as soon as Teamviewer connects to a client. The participant can clearly hear us, but we can't hear the participant.
We have found this to be caused by windows automatically adjusting the volume of different sounds when we are using the PC to place or receive telephone calls. It is however ironic that Teamviewer mutes Teams - it would have been more logic the other way around. We also notice that Teams does not mute other sounds on the computer. This used to work under Skype for Business. Because of this we have to adjust the following setting found under Control Panel - Sound - Communications:
Setting changed from "Mute all other sounds" to "Do nothing".
I hope this can be corrected to let Teams trigger and be the preferred audio channel and phone client on Windows.
We have also adjusted the Audio Conferencing settings found in Teamviewer. It should however had the option to disable audio conferencing in the same way that they have implemented under Video.
Mute Voice Playback to stop receive computer audio from client. Set Conference mode to Phone.
We are experiencing some problems related to booking of exchange room resources in Microsoft Teams. Some meetings are not booked in the Exchange room resource calendar which might result in problem with double-booking of the physical room and problems connecting to the meeting from a Skype Room System.
A Teams meeting can be booked from both Outlook Calendar and from the Microsoft Teams client. If you are booking the meeting in Outlook Calendar and the Teams meeting plug in, you can’t select a corresponding Teams Channel for the meeting. It is therefor preferable to use the meetings tab in the Teams Client for booking the Teams meeting. In order to have the Exchange Room Resources available in Microsoft Teams, you have to add the Exchange resources to distribution groups.
I have spent some time researching the problem with missing bookings from Teams meetings in Exchange room resources. The research made the following findings:
If the room resource is selected before Team/Channel is selected, the room is not booked in the Exchange calendar for the room resource.
If a Teams meeting with a meeting room is edited afterwards, the Exchange room calendar loses its booking.
I guess this will be fixed soon on the Microsoft Teams client. Until then, we have to make sure to do the booking variables correctly and in the correct sequence:
Choose Channel before meeting room
If you have any experience related to this issue, I would be glad to hear!
Trio har vært lenge i markedet, og viser stadig evne til å videreutvikle og forbedre seg. I sin siste versjon Trio Enterprise 7.1 kommer de med en ny klient for de brukerne som hverken jobber som ekspedient eller agent i systemet. Med dette retter de seg mot dagens trender med arbeidere som jobber fra flere typer terminaler og som gjerne er like mye utenfor kontoret som inne på kontoret.
Om Trio User
Den nye applikasjonen kalles Trio User og er en webbasert tjeneste. Det nye grensesnittet har en adaptiv utforming som gjør at den automatisk tilpasser seg skjermstørrelsen den åpnes opp på. Dette innebærer at bruken og utseendet er noe ulikt avhengig av hvilken type enhet man benytter. Funksjonene er likevel tilgjengelig på de plattformene som er støttet - PC, nettbrett og smarttelefon. Trio User støtter den nye Single-Sign-On rutinen til Trio.
Trio User skalert på mobiltelefon
Trio User åpnet på PC
Søk
Uansett hvilken side du befinner deg på i Trio User vises søkefeltet for søk i bedriftskatalogen helt øverst i bildet. Trio User vil søke automatisk i bedriftskatalogen etterhvert som du skriver i søkefeltet. Søket gjøres i tilgjengelige felt som fornavn, etternavn, mobilnummer, avdeling og tittel. Slik kan du raskt finne kolleger med oppdatert kontaktinformasjon og status. Er du usikker på stavelser kan søket kombineres med * for ukjente antall tegn eller ? for et ukjent tegn. Dette kan benyttes hvor som helst i søkebegrepet - i starten, slutten eller midt inne i te*ten..
Søk i Trio User fra mobiltelefon
Søkeresultatet vil bli sortert på etternavn etterfulgt av fornavn, avdeling og tittel. Trefflisten vil vise de 50 første treffene. Ved å trykke på en av radene i søketreffet vil du få opp full informasjon om personen. Fra søkeresultatet eller detaljinformasjonen kan det sendes epost, ringes direkte eller sende SMS. Mobilstatus og Presence vil også vises i Trio User dersom denne typen informasjon er tilgjenglig i deres Trio løsning.
Detaljvindu fra søk i Trio user på mobiltelefon. All informasjon og bilde kommer direkte fra Trio katalog.
Fravær
Jeg har tidligere beskrevet fraværssystemet i Trio Enterprise som nøkkelen til suksess. Trio User vil i søkeresultatet vise fravær som kolleger er inne i med egne ikoner. Detaljvisningen på en kollega vil også kunne vise fremtidige planlagte fravær.
Du vil også ha oversikt over dine egne fravær samt ha muligheten til å sette egne fravær direkte fra programmet. Trio User vil derfor være til stor hjelp for å styre ditt eget fravær, og da spesielt sporadiske fravær som ikke er planlagt inn gjennom kalenderkoblingen. Dette er typisk fravær som "Lunsj" og "Gått for Dagen" som beskrevet i tidligere artikkel om fravær - disse kan derfor med fordel legges opp som favoritter i Trio User slik du ser i første bildet i denne artikkelen. Fravær som legges gjennom Trio User vil på vanlig vis kunne stenge kontortelefon og mobiltelefon og gi opplest fravær om ønskelig.
Øvrige funksjoner
De som har Trio Talepost vil få tilgang til å administrere sin talepostkasse gjennom Trio User.
For enkel og rask tilgang til applikasjonen kan du lage en snarvei til Trio User på ditt skrivebord eller startskjerm. Dette gjøres i menyen på nettleseren og den vil da lede til den siden i Trio User som var i bruk når snarveien ble opprettet.
Eksempel på menyvalg for å legge til snarvei på startskjerm på Android mobiltelefon.
Snarvei på Android kan legges på skrivebord eller i mapper sammen med andre snarveier.
Videre utvikling
Det er ventet at det kommer til flere funksjoner til Trio User fremover og at Assistant for Web (POW) blir avviklet. Det er også sansynlig at Trio GuestWeb erstattes av Trio User. Det er betryggende å se hvordan Trio utvikler sitt produkt videre mot den mobile arbeidsstyrken.
Er dette en funksjon du ser glede og nytte av? Kunne du tenkt deg tilgang til dette på din arbeidsplass? Ta gjerne kontakt eller legg igjen en kommentar under rundt dette temaet.
Det finnes omtrent like mange applikasjoner for epost som det finnes tre i en middels norsk barskog. De adresserer alle et område som for mange oppfattes som personlig og hvor de fleste har forskjellige arbeidsvaner. For få år siden var det utenkelig at Microsoft skulle slippe Outlook for Android og iOS. Kan det nå tenkes at dette i dag er eneste riktige standard for jobbmail?
Epost applikasjoner er en morsom liten greie. På samme måte som nettlesere har vi benyttet de i alle evighet. Likevel er kravene og behovene annerledes i dag enn i 1999. Teknologien er mye lik, men brukeropplevelsen og kravet til sikkerhet har utviklet seg enormt.
Outlook uavhengig av plattform
I bedriftsammenheng har Microsoft Exchange vært dominerende som epost løsning, og gjennom Exchange Active Sync har vi lenge fått epost, kalender og kontakter inn på smarttelefonen. Dette har utviklet seg stadig. Serverplattformen har for de fleste etterhvert flyttet ut i Microsoft sin skyløsning, samtidig som de ansatte i større grad enn før ønsker tilgang fra personlige enheter. Dette øker nødvendigheten av sikkerhet rundt løsningen, noe som igjen setter premisser for hvilke epost applikasjoner som er fornuftig å benytte. Her seiler Microsoft Outlook opp som den beste og sikreste klienten for Android og iOS.
Ved hjelp av mekanismer i Microsoft sin skyløsning kan nå bedriften og brukernes kommunikasjon og data sikres. Dette krever dog at det er Microsoft sine egne applikasjoner som benyttes også på mobiler og nettbrett. Sikkerheten kan da ivaretas mellom Outlook, Word, Excel, OneDrive for Business, OneNote, Teams og andre applikasjoner fra Microsoft. Tilgangen mellom klient og server sikres da samtidig som dataene i applikasjone også sikres at de ikke kommer på avveie. Inntil nylig var epostadresse og passord det eneste man trengte for å sette opp epost på mobiltelefonen. Nå kan og vil det settes strengere krav for tilgangen til bedriftens data - dersom du vil ha epost på din telefon må reglene følges.
Outlook App tilpassinger
Outlook App på Android og iOS er relativt fersk, spesielt sammenlignet med Outlook på PC som ble lansert i 1997. I starten var Outlook app svært mangelfull, men den har nå utviklet seg til å bli den beste applikasjonen man kan ha for å betjene epost og kalender på mobiltelefonen. I utgangspunktet er Outlook App god. Jeg har likevel funnet at den krever noen enkle tilpasninger for å bli perfekt for meg. Heldigvis lar den seg tilpasse, og her kommer en liste over de endringer jeg har satt opp for meg selv:
Tilpassingene gjøres fra Settings menyen inne i Outlook.
Trykk oppe i venstre hjørne av Outlook for å få opp mappelisten med snarvei til Settings.
Bildene her er fra Android, men finnes også for iOS.
(trykk for større bilde)
Jeg pleier å tilpasse alternativene for å sveipe i Innboksen til min behov.
(trykk for større bilde)
Kan her velge hva som skjer når man sveiper til høgre og venstre.
Jeg har valgt at markere som lest/ulest ved sveiping til høgre.
Til venstre har jeg valgt å slette eposter.
(Trykk for større bilde)
Jeg har ellers satt opp en personlig autosignatur i Outlook App omtrent som i Outlook på PC.
Les forøvrig egen artikkel rundt autosignatur i Outlook på PC.
(Trykk for større bilde)
Autosignatur kopierte jeg med meg fra en mail sendt fra PC funnet i sendte elementer.
Den er noe tilpasset ettersom jeg ikke har rik tekstformatering her.
(Trykk for større bilde)
Organisering og visning av eposter oppleves bedre om man fjerner haken for "Organiser etter tråd". Dette gjelder spesielt opplevelsen ved å svare på epost.
(Trykk for større bilde)
Under Innstillinger - Kalender kan du sette på visning av ukenumre i Outlook kalenderen.
For å få med kontakter fra Outlook og inn i telefonens kontakter må selve kontoen tilpasses.
Dette forutsetter at denne muligheten ikke er låst ned sentralt.
(Trykk for større bilde)
Velg nå å synkronisere kontakter fra Outlook og inn på enheten. Ved bruk av Android Work Profile vil disse kontaktene nå legges i kontakter tilhørende den profilen. Dialoger fra disse kontaktene (sms etc) vil da bli markert som jobbdialoger.
(Trykk for større bilde)
På iOS har jeg valgt å legge inn Outlook, Teams og OneNote som valg under dele-knappen.
Dette settes enkelt opp med siste knappen på linjen.
(Trykk for større bilde)
Det kan være hensiktsmessig å fjerne visning av Outlook elementer på låstskjermen.
Her er eksempel fra iOS hvor man under Innstillinger - Varslinger - Outlook fjerne hake for å vise varsler på låst skjerm.
(Trykk for større bilde)
Kalenderbruk
Etter innføringen av Intune for administrasjon av mobile enheter og sikring av bedrifters data er det mange som mister kalenderinnslagene fra Outlook Kalender inn mot den innebygde kalenderen i iOS og Android. Dette kommer i tilfelle som en følge av at Intune er satt opp til å begrense Exchange synkronisering kun mot applikasjoner som lar seg administrere. Appen Microsoft Outlook er et eksempel på dette. Kalenderinnslagene fra bedriftskalenderen vil derfor kun være tilgjengelig gjennom applikasjonen Microsoft Outlook.
Det kan derfor være like greit å venne seg til å benytte kalenderen i Microsoft Outlook ved innføring av Intune. Bruk kalenderen til å opprette nye avtaler og følge opp agendaen din på jobb. Husk du kan tilpasse visningen.
Velg Kalenderdelen av Outlook Appen og tilpass visningen.
Prøv også kalenderen på nettbrettet i liggende visning.
(Trykk for større bilde)
Private kalendere inn i Outlook Kalender
Det har nå kommet mulighet for å legge de private kalenderne inne i Outlook appen (Google kalender, iTunes kalender og øvrige kalendere som er definert opp på enheten). Dette gjør at man da får en samlet visning over avtaler på jobb og privat direkte i Outlook kalender. Når aktuelle kalendere er lagt inn, kan man enklet velg hvilke som skal vises i menyen. Det blir da også mulig å opprette nye avtaler i de private kalenderne gjennom Outlook appen. Med denne utvidelsen har jeg nå min jobb og privat kalender tilgjengelig i Outlook. Jeg har tilgang til interessante delte kalendere på jobb og jeg har tilgang til familiens private Gmail kalendere direkte i Outlook kalender.
Trykk på "+" knappen inne på menyen i Outlook Kalender og du får tilgang til å legge til andre kalendere på enheten, delte kalendere fra Exchange, Gmail kalendere, iCloud kalendere med mere.
Jeg håper du finner noen av disse tipsene interessante. Har du andre tilpasninger du selv pleier å gjøre er jeg glad om du tipser meg om disse - legg gjerne igjen en kommentar under her. Ønsker du hjelp til å få kontroll over bedriftens data som bor ute på de ansattes mobiltelefoner kan vi i Serit bistå med dette - ta gjerne kontakt for å høre mer om mulighetene som finnes for å sikre at brukerne har riktige verktøy på sine mobiler og at dataene i verktøyene forblir sikre.