Tuesday, June 28, 2022

Install printers from AD printserver on AAD joined computers

When you go from a traditional IT operation model to modern based on Azure AD and Endpoint Manager, you will have a migration period with resources in both camps. Typically, endpoints first go to the cloud while well-established services lag behind. 

This does not have to tie the endpoints to the ground. You can move your computers to pure Azure AD join, and still have access to on-premises services in Active Directory as long as the identities are hybrid. 

Some tend to use Hybrid Azure AD Join (HAADJ) since they have some legacy traditions of device and application management. HAADJ can thus be tempting, but in the long run it will give more headache than pleasure. The best approach is to move the endpoints to pure Azure AD Join devices and then put more effort into adapting to the new operational environment offered by Microsoft Endpoint Manager.

Printers and print servers are one example of services that tends to be strongly attached to the premises, even though there are great alternatives in the cloud with Microsoft Universal Print or 3rd parties like Printix. With the hybrid identity signed in to the Azure AD joined Windows device, you can also use the existing Active Directory joined print server. I have created a Powershell script which can be used with Microsoft Endpoint Manager to distribute printers on a print server to Azure AD joined computers. This can be a great approach to make the move to the cloud more resilient, even though you will lose much of the borderless functions from a pure cloud-based print solution.

The script is available on my GitHub. 

Saturday, June 25, 2022

Windows 11 - Customize the Start menu layout

I believe the workday can be a tad less cluttered if certain stuff have a fixed placement. In a managed environment there might be interesting to have a customized start menu layout for all users giving a default set of pinned apps in a fixed order. This blog post will walk you through the routine of setting this up on Windows 11 by use of Microsoft Endpoint Manager.

Note: A customized start menu layout overwrites the entire existing layout. A partial locked layout like offered on Windows 10 is not available on Windows 11. The layout can be changed by the user.

Create a JSON settings file

Set up your preferred Start menu layout on an existing Windows 11 computer. Pin the apps you like on the start menu and arrange the order of these apps.
Configure a preferred start menu layout on an existing Windows 11 device


Start Windows Powershell and export the configuration to a JSON file.

Friday, June 24, 2022

Windows 11 - Custom theme with MEM

If your company has a strong branding profile, you might be interested in assigning a custom desktop theme pack to your Windows 11 computers reflecting your brand. I have put together a simple routine for distributing a deskthemepack with Microsoft Endpoint Manager.

Design your preferred theme

Use the Settings app on a Windows 11 computer to design your preferred desktop theme. After setting a preferred background, sounds, colors and mouse cursors, you can save this as a named theme.

You now have this as a theme on your computer which can be exported for sharing. Save this as a file on your computer.

Tuesday, June 21, 2022

Rename computers with countrycode in Intune

During an engagement at a customer there was a demand of having all computers in Endpoint Manager/Intune renamed to a naming standard including the two character ISO country code from the device owner followed by the serial number of the device. This was solved by using Graph API in a Powershell script running in an Azure Runbook.

The mission

The mission is to have all Windows devices in Microsoft Endpoint Manager follow a specified naming standard giving the device a unique name consisting of a country code and the device serial - ie: NO-132435465768. The solution must address existing and new devices.

The challenge with this design is related to compiling a device name consisting of the country code found at the user owning the device and the serial found on the device it self. I have found examples online for renaming endpoints, but these did not get hold of the country codes from the user to use as part of the new device name. Some of these examples include:

New devices - autopilot profiles


During the initial phase of this project, I did design a configuration for Autopilot allowing the devices to start out with the correct device name upon the initial onboarding. This was based on several group tags matched with corresponding AutoPilot profiles. A specialized menu was built in order to ease the hash collection and at the same time have the group tag specified.

image
Menu used for selecting country code when getting the hardware hash code

This did work as expected for new computers. The CSV hash file got a Grouptag specified pr. device based on the operators choice when collecting the hash. When uploaded to Intune, the Grouptag did match with an Azure dynamic device group which in turn was targeted towards the corresponding autopilot profile setting the correct name on the device.

Although this was a full-blown technical solution, it didn't live up to the expectations of easy implementation from the first line helpdesk. The setup was therefore reversed leaving one common autopilot profile for each and every windows device in the tenant.

Existing devices - renaming with script

Initially this was thought as a one shot run to rename existing devices. As the first phase of naming new machines during Autopilot was neglected, the challenge is somewhat extended to do renaming of devices on a regular basis. This has led to a Powershell script running in an Azure Runbook on a schedule once pr. day.

Pseudo code

The script has a hash table with current countries. The script will recure the country list selecting all users belonging to each country and further on list each device belonging to those users. Attributes from the user gives access to information about the country, while attributes from the device gives information about the serial number. The script takes into account the maximum length of 15 characters for computer names. This gives the fundaments for renaming the computer to the given naming standard. A rename will be initiated if the existing computer name differs from the standard.

Azure App Registration

The script authenticates through an Azure App Registration which has the following Microsoft Graph API application permissions:

  • DeviceManagementManagedDevices.PrivilegedOperations.All
  • DeviceManagementManagedDevices.ReadWrite.All
  • Directory.Read.All
  • User.Read
The app secret for the app registration is created with powershell in order to have extra life time:
    $startDate = Get-Date
    $endDate = $startDate.AddYears(9)
    $ObjectID = 'XXXXXXXX-XXXX-XXXX-XXXX-XXXXXXXXXXXX'
    $aadAppsecret01 = New-AzureADApplicationPasswordCredential -ObjectId $ObjectID -StartDate $startDate -EndDate $endDate
    ($aadAppSecret01).Value

Azure Runbook

The TenantID, ClientID and ClientSecret from the app registration are stored as encrypted variables in the Azure Runbook.
Encrypted variables stored in the runbook

The runbook does have most of the modules loaded already, except for the Microsoft.Graph.Authentication module which has to be added from the Gallery.

The script can now be added, published and linked to a schedule in the runbook. The script is available on my Github, and it has some comments throughout the code describing the process.

<#

  .NOTES
  ===========================================================================
   Created on:      09.05.2022
   Created by:      Simon Skotheimsvik
   Filename:        MEM-ChangeOfComputerNames-Runbook.ps1
  ===========================================================================
 
  .DESCRIPTION
    This script uses the Graph API to bulk rename Windows devices. It can for
    example be used in a scenario where autopilot default naming has been used
    and a new standardised naming convention has been agreed upon. This Script
    will use the Country Code from the owning users Azure Account. It can be
    modified to use other user variables as well.

    The script is designed to run unattended in an Azure Runbook.
     
  .EXAMPLE
    MEM-ChangeOfComputerNames-Runbook.ps1

#>

$GLOBAL:DebugPreference="Continue"

$Countries = @{
    Norway = "NO"
    Vietnam = "VN"
    Brazil = "BR"
    Chile = "CL"
    Croatia = "HR"
    India = "IN"
    Italy = "IT"
    Poland = "PL"
    Romania = "RO"
    Singapore = "SG"
    Canada = "CA"
}

# CONNECT TO GRAPH WITH AZURE APP-REGISTRATION STORED AS ENCRYPTED VARIABLES
$TenantId = Get-AutomationVariable -Name 'Computer_Rename_TenantID'
$ClientId = Get-AutomationVariable -Name 'Computer_Rename_ClientID'
$ClientSecret = Get-AutomationVariable -Name 'Computer_Rename_ClientSecret'

# Create a hashtable for the body, the data needed for the token request
# The variables used are explained above
$Body = @{
    'tenant' = $TenantId
    'client_id' = $ClientId
    'scope' = 'https://graph.microsoft.com/.default'
    'client_secret' = $ClientSecret
    'grant_type' = 'client_credentials'
}

# Assemble a hashtable for splatting parameters, for readability
# The tenant id is used in the uri of the request as well as the body
$Params = @{
    'Uri' = "https://login.microsoftonline.com/$TenantId/oauth2/v2.0/token"
    'Method' = 'Post'
    'Body' = $Body
    'ContentType' = 'application/x-www-form-urlencoded'
}

$AuthResponse = Invoke-RestMethod @Params

$Headers = @{
    'Authorization' = "Bearer $($AuthResponse.access_token)"
}

# Connect-MgGraph with Token in order to be able to post a computer renaming
$connection = Invoke-RestMethod `
    -Uri https://login.microsoftonline.com/$TenantId/oauth2/v2.0/token `
    -Method POST `
    -Body $body
 
$token = $connection.access_token
Connect-MgGraph -AccessToken $token

write-output "Authentication finished"

############################################################
# ROUTINE FOR RENAMING USERS AUTOPILOT DEVICES
############################################################

foreach ($CountryCode in $Countries.keys) {
    write-output "Working on country $CountryCode"
    $Country = $CountryCode
    $CountryCode = $($Countries[$Country])
    $MaxSerialLength = (15 - $CountryCode.get_Length())-1 #Max 15 characters allowed in devicename. Calculate length of serial# part.
    $userList = $Null

    # Get all users with the current country code. Use paging in order to get more than 999 which is max pr query
    $UsersURL = 'https://graph.microsoft.com/v1.0/users?$filter=startswith(country,'''+ $Country +''')&$top=999'
    While ($UsersURL -ne $Null) {
        $data = (Invoke-WebRequest -Headers $Headers -Uri $UsersURL -UseBasicParsing) | ConvertFrom-Json
        $userList += $data.Value
        $UsersURL = $data.'@Odata.NextLink'    
    }

    # Get all managed devices for each user
    foreach ($User in $UserList) {
        $upn = $User.userPrincipalName
        write-output "- Focus on user $upn"
        $DeviceList = $Null
        $deviceURL = 'https://graph.microsoft.com/v1.0/users/'+ $User.userPrincipalName +'/managedDevices?$filter=startswith(operatingSystem,''Windows'')'
        $DeviceList = (Invoke-RestMethod -Uri $deviceURL -Headers $Headers).value
        $NoOfDevices = $DeviceList.Count
        write-output "- $NoOfDevices device(s) found"

        foreach ($Device in $DeviceList) {
            $CurrentDeviceName = $Device.deviceName
            write-output "--- Focus on device $CurrentDeviceName"
            $OS = $Device.operatingSystem
            $DeviceID = $Device.id
            $FullSerial = $Device.serialNumber

            # Max 15 characters allowed in devicename - Some devices have to long serialnumber
            if ($FullSerial.get_Length() -gt $MaxSerialLength) {
                $DeviceSerial = $FullSerial.substring($FullSerial.get_Length()-$MaxSerialLength)
                write-output "---- Serial too long - shortened!"
            }
            else {
                $DeviceSerial = $FullSerial
            }
            # Calculates new devicename in format NO-12345678
            $CalculatedDeviceName = $CountryCode.ToUpper() + '-' + $DeviceSerial
           
            # Virtual computers have the text "SerialNumber" as serialnumber...
            if (($CurrentDeviceName -ne $CalculatedDeviceName) -and ($DeviceSerial -ne "SerialNumber")) {
                write-warning "---- Device $CurrentDeviceName needs to be renamed to $CalculatedDeviceName"
                # Calculate graph api url's
                $Resource = "deviceManagement/managedDevices/$DeviceID/setDeviceName"
                $GraphApiVersion = "beta"
                $URI = "https://graph.microsoft.com/$GraphApiVersion/$($Resource)"

                $JSONPayload = @{
                "deviceName" = $CalculatedDeviceName
                }

                $convertedJSONPayLoad = $JSONPayload | ConvertTo-Json
               
                #Send change to Graph.
                Invoke-MgGraphRequest -Uri $URI -Method POST -Body $convertedJSONPayLoad -Verbose -ErrorAction Continue
            }
            else {
                write-output "---- $CurrentDeviceName will not be renamed"
            }
        }
    }
}


Verify the results

When running the script, all outputs can be found in the logs, and all renamed computers are logged as warnings:

Feedback from the script with renamed computers found as warnings

This is reflected on the device in the Microsoft Endpoint Manager:

Device waiting to be renamed

As with other renaming requests in Microsoft Endpoint Manager, it requires the device to reboot before all registers (AzureAD, Intune, AutoPilot, Device) are up to date.

Device rename confirmed in the portal

Summary

This routine will effectively and automatically rename devices on a given schedule as long as the app secret is valid. The script can be altered to mix and match variables from user and device in order to create the corresponding device name for your naming convention. You can for example use information from the user like department, company, region, postalcode as a part of the computername.

No extra charge for the mistakes - solution shared as it is - use it at your own risk.

Thanks for reading - please share and comment.


Thursday, June 2, 2022

Reduce background noice in Teams Room System

It has been a while since Microsoft released their machine learning based noise suppression for Microsoft Teams. With this setting available all background noise like shuffling papers, slamming doors, barking dogs, and so on are effectively reduced. This technology has quickly fallen into our pattern of use - which in turn has led to expectations of finding this in the meeting rooms

The new hybrid workspace is the hottest trend right now. At any time, a hybrid workplace will consist of both remote workers and in-office workers. Synchronizing these groups of employees into a cohesive, collaborative unit can be quite a challenge in order to not leave one group feeling anonymized or voiceless. 

Microsoft Teams rooms should bring organizations closer to the ideal of hybrid work giving remote side workers the same opportunities to actively participate in the meeting. We see constant developments to support this, like the recent Front Row Layout for meetings. 

As a remote worker, I often find unintentional noise from meeting rooms to be the biggest disturbance in meetings. This can be all from paperwork, pens and fingers drumming on the table, cups and cutlery, small talk and meeting in meetings. I am therefore happy to finally see machine-based noise cancellation available on the Teams Rooms System.

When in a call, settings for noise suppression are now found on the meeting room controller:

Click on the image for a larger view

Teams offers three levels of noise suppression to help keep meeting participants focused. These settings can be changed at any time. For the Teams desktop app and iOS, the settings carries over to the next meeting or call once they are changed. This is not yet the case for Teams Room System. 

The noise suppression feature can be enabled or disabled on the Teams Room Device by use of the NoiseSuppressionDefault variable found in an XML Configuration file as described here. 

Click on the image for a larger view

The article describes several settings and how these can be implemented on devices in small and large scale. The documentation does not state how to set Low or High as the default setting. This has been discussed in this Twitter thread, where @MauroB94454117 states that the code implemented is ahead of documentation at this time. The documentation is missing the part on how to force noise suppression to Low or High settings. This is done with the following variables in the XML file which are tested and found Ok:

0 = Off
1 = Auto
2 = Low
3= High 

The following XML file gave me the highest level of noise suppression as the default state:

<SkypeSettings>
  <NoiseSuppressionDefault>3</NoiseSuppressionDefault>
</SkypeSettings>

 These are small steps to a better hybrid workspace in the modern workplace!

Hardware based noise suppression

Logitech Rally cameras are also introducing AI noise suppression enhancement algorithms in their firmware version 1.1.167. This is to improve video conferencing experience for remote participants. This update is available for download from the Logi webpages.

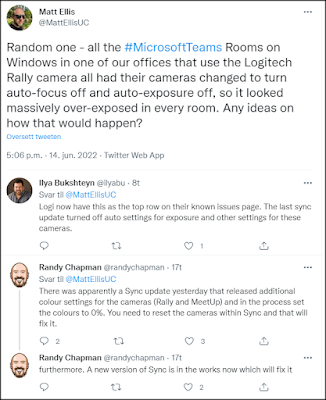
Normally updates of firmware and software brings new features and better security, but it also seems to introduce new unintentional problems - or "features". There are information in the community stating that the Logitech Rally Cameras might get problem with exposure and focus after updating. You can read about this on a fresh twitter message dialogue from Matt Ellis, Ilya Bukshteyn and Randy Chapman:

15.08.2022 - Video demo
Today a great video demo on this feature was released by ISDM Solutions - take a look here: https://youtu.be/gVvspCd0FaA 


Tuesday, April 19, 2022

Veeam Backup for M365 Automatic Reporting in PowerBI

Those of you which has read through the Microsoft services agreement might have noticed paragraph 6b where Microsoft recommends that you regularly backup your content and data that you store on the services using third-party apps and services. One example of such third party tool popular by managed service providers is the Veeam Backup for Microsoft 365. This blog post will explain how you can get automatic reporting on licenses and sizes used by this application.

Please note: This is not a sponsored post!

Data Deletion

Data deletion can occur when an attacker deletes your data, usually in a way that makes recovery difficult, if not impossible. A variant of this type of attack includes ransomware. With ransomware, an attacker compromises the network, encrypts data, and then demands a payment to get the key to decrypt the data. This may equate to data deletion since a successful extraction of payment often leads to more targeting by the attacker. Attacker motivations for data deletion covering the tracks of an attack, attempting to do irreparable harm to your business, or simply trying to spite you or your employees

Preventing data deletion

Other than the protection mechanisms you should employ to prevent account breach an elevation of privileges, your core prevention strategy should be to ensure you have sufficient redundancies built into your data management processes to minimize the impact of data deletion. Data in Microsoft 365 is made redundant for maximum availability by the service. However, it's still possible for an attacker to delete data from SharePoint sites and recycle bins, making it almost impossible to recover. There is also examples of bugs where data has been deleted from Teams and Sharepoint. Therefore, it's critical that you have a process for backing up mission critical data to offline stores - just like the Microsoft Services Agreement states.

Veeam Backup for Microsoft Office 365

Veeam Backup for Microsoft 365 is one application which can help eliminate the risk of losing access and control over your Office 365 data, including Exchange Online, SharePoint Online, OneDrive for Business and Microsoft Teams. This product is often used by managed service providers offering their services to customers. One challenge will be to automate a reporting solution showing the usage of the service related to license and storage on repositories.

Report automation

Niels Engelen has described a way to automatically send reports from Veeam by email. This is a simple approach to the standard functionality where PDF report will be sent by e-mail. It just didn't fit my expectations for reporting. 

PowerShell data harvesting

I have studied the Veeam Backup for Microsoft 365 PowerShell Reference and made a script counting all licenses, data usage and repository usage on a daily basis. This data is prepared in a JSON format and uploaded to an Azure Cosmos Database. The Azure Cosmos Database is quite inexpensive for this kind of usage. 

The following query will list all licensed users in a JSON format before uploading each record to the Cosmos database.
# Get VBO Licensed users, convert to JSON and upload to CosmosDB
$CosmosDBCollectionID = 'VeeamBackupLicenses'
$LicensedUser = Get-VBOLicensedUser

$output = foreach ($user in $LicensedUser) {
    $LastBackupDate = (($user.LastBackupDate).toString()).Split(" ")[0]
    $id = $([Guid]::NewGuid().ToString())
    $doc = [pscustomobject]@{
        id               = $id
        Username         = $user.UserName
        LastBackupDate   = $LastBackupDate
        Year             = (($LastBackupDate).toString()).Split(".")[2]
        Month            = (($LastBackupDate).toString()).Split(".")[1]
        LicenseState     = $user.LicenseState
        OrganizationName = $user.OrganizationName
    }
    $document = $doc | ConvertTo-json | Out-String
    # Writing data to CosmosDB
    New-CosmosDbDocument -Context $cosmosDbContext -CollectionId $CosmosDBCollectionID -DocumentBody $document -PartitionKey $id -Encoding UTF-8
}


The next query will get the usage pr. organization and upload this to a CosmosDB in JSON format:
# Get VBO Usage pr Organization, convert to JSON and upload to CosmosDB
$CosmosDBCollectionID = 'VeeamBackupUsage'
$Organizations = Get-VBOOrganization
$Date = get-date -Format "dd.MM.yyyy"

$UsageOutput = foreach ($Org in $Organizations) {
    $UsageData = Get-VBOUsageData -Organization $Org
    # Need to handle the fact that a customer can have data in several repositories
    foreach ($Usage in $UsageData) {
        $id = $([Guid]::NewGuid().ToString())
        $UsedSpaceGb = [MATH]::Round((($Usage.UsedSpace) / 1024 / 1024 / 1024), 1)
        $Udoc = [pscustomobject]@{
            id               = $id
            Date             = $Date
            RepositoryId     = $Usage.RepositoryId
            UsedSpaceB       = $Usage.UsedSpace
            UsedSpaceGB      = $UsedSpaceGb
            OrganizationName = $Usage.Organization.DisplayName
            OrganizationMSID = ($Usage.Organization.Id.Value).Split(":")[0]
        }
        $Udocument = $Udoc | ConvertTo-json | Out-String
        # Writing data to CosmosDB
        New-CosmosDbDocument -Context $cosmosDbContext -CollectionId $CosmosDBCollectionID -DocumentBody $Udocument -PartitionKey $id -Encoding UTF-8
    }
}

The third query will get information about the repositories defined in Veeam Backup for Microsoft 365 and upload this in JSON format to the Cosmos Database. The original data values from the queries are in bytes format.
# Get VBO Repositories, convert to JSON and upload to CosmosDB
$CosmosDBCollectionID = 'VeeamBackupRepositories'
$Repositories = Get-VBORepository
$Date = get-date -Format "dd.MM.yyyy"

$RepositoryOutput = foreach ($Repo in $Repositories) {
    $id = $([Guid]::NewGuid().ToString())
    $RepoCapacityTb = [MATH]::Round((($Repo.Capacity) / 1024 / 1024 / 1024 / 1024), 1)
    $RepoFreeSpaceTb = [MATH]::Round((($Repo.FreeSpace) / 1024 / 1024 / 1024 / 1024), 1)
    $Rdoc = [pscustomobject]@{
        id                    = $id
        Date                  = $Date
        RepositoryId          = $Repo.Id.Guid
        RepoName              = $Repo.Name
        RepoPath              = $Repo.Path
        RepoCapacityB         = $Repo.Capacity
        RepoCapacityTB        = $RepoCapacityTb
        RepoFreeSpaceB        = $Repo.FreeSpace
        RepoFreeSpaceTB       = $RepoFreeSpaceTb
        RepoRetentionType     = $Repo.RetentionType
        RepoRetentionPeriod   = $Repo.RetentionPeriod
        RepoRetentionFreqType = $Repo.RetentionFrequencyType
    }
    $Rdocument = $Rdoc | ConvertTo-json | Out-String
    # Writing data to CosmosDB
    New-CosmosDbDocument -Context $cosmosDbContext -CollectionId $CosmosDBCollectionID -DocumentBody $Rdocument -PartitionKey $id -Encoding UTF-8
}

These different Powershell parts are coordinated and scheduled to run as powershell scripts on a regular basis on the Veeam backup servers.
  <Actions Context="Author">
    <Exec>
      <Command>C:\Windows\System32\WindowsPowerShell\v1.0\powershell.exe</Command>
      <Arguments>-ExecutionPolicy bypass -file "C:\Simon\CountVeeam365LicensesDailyToPowerBI.ps1"</Arguments>
    </Exec>
  </Actions>

PowerBI data analyzis

Using PowerBI Desktop, it is easy to connect to the Cosmos Database. With the data loaded into Microsoft PowerBI you can do further manipulations of the data using DAX queries. One example could be to calculate the difference between capacity and free space for the repositories in order to get the used space pr. repository. This could be done like this which will return a separate column with the result ready to use in the report:
RepoUsedSpaceB = CALCULATE(SUM(VeeamRepositories[RepoCapacityB]))-CALCULATE(SUM(VeeamRepositories[RepoFreeSpaceB]))

I have also made a calculation of consumed GB pr user in each company. This is done in two steps. First I calculate number of users pr. company:
AntallBrukere = DISTINCTCOUNT(VeeamLisenser[Bruker])

Then I calculate consumed GB pr user in the company:
GBprBruker = SUM(VeeamUsage[UsedSpaceGB])/Kalkulasjonstabell[AntallBrukere]

Using Power BI we can easily create several reports to visualize the status of the service.

Example of monthly report of all companies and users protected by Veeam 365 Backup which can be the basis for invoicing where this is based on the number of users in the system pr. company.


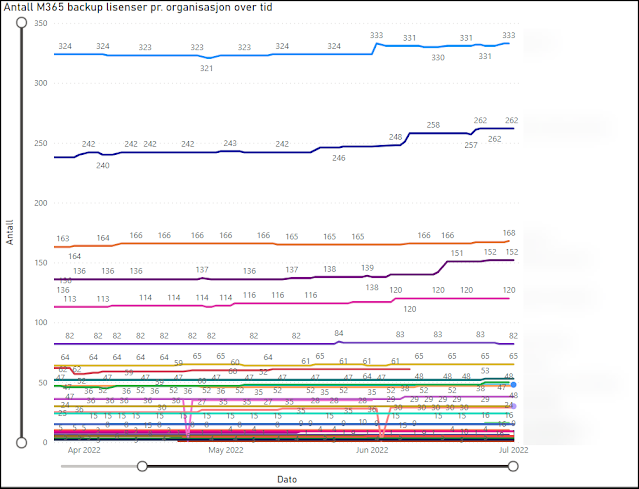
Example of historical development of backup up users pr. company by Veeam 365 backup.

Example of gigabyte compared to number of users pr. company protected by Veeam 365 backup.

Example of usage of the calculated column for GB pr User. Infinity comes from stored data for customers which have terminated their contract where data still exists. This has been removed from the graph with a visuals filter displaying only companies with more than 0 users.


Example of report for repositories with forecast in the Veeam 365 backup service.

This gives a fully automated always up to date reporting solution showing current usage and historical development related to the provided service, license usage and storage consumptions. The reports can easily be filtered by clicking on the values and graphs giving the consumer of the reports the ability to select the desired view. 


The animation is blured to protect the data exposed in the report

If you upload your PowerBI report to the online PowerBI service, you can set the dataset to automatically update directly from the Cosmos Database. This will allow for online consumption of the report from all your devices. One idea could be to add it as a tab in a suitable team channel in Microsoft Teams giving easy access for everyone interested in the topic.

I do believe someone could have interest in the PowerBI Report file, but unfortunately this can't be shared because my reports contains PII data. 

Conclusion

I hope this could inspire someone to dive into data capturing and report building. If you have thoughts, ideas, comments or ideas after reading this far, please add a comment.


Sunday, April 3, 2022

Good insights in Microsoft license usage

Cloud based IT solutions does have a pretty predictive cost when each and every license is based on a price pr user pr month. This should make it easy to budget the cost of each user role. The challenge might be to have an up to date overview of the license portfolio, both current and over time.

In order to give automated insights to the license situation, I have made a solution which has been installed at several tenants. Based on Microsoft Graph API powershell queries for running in Azure function apps, I am populating license information data from user accounts to a cheap Azure Cosmos DB. These data are then connected to PowerBI where I have created a report giving a detailed insight to the license portfolio pr. company, department, user. The report which can be granulated on year. quarter, month, week or day gives an accurate insight to the consumption of Microsoft licenses in the tenant, which helps address any misconfigurations.

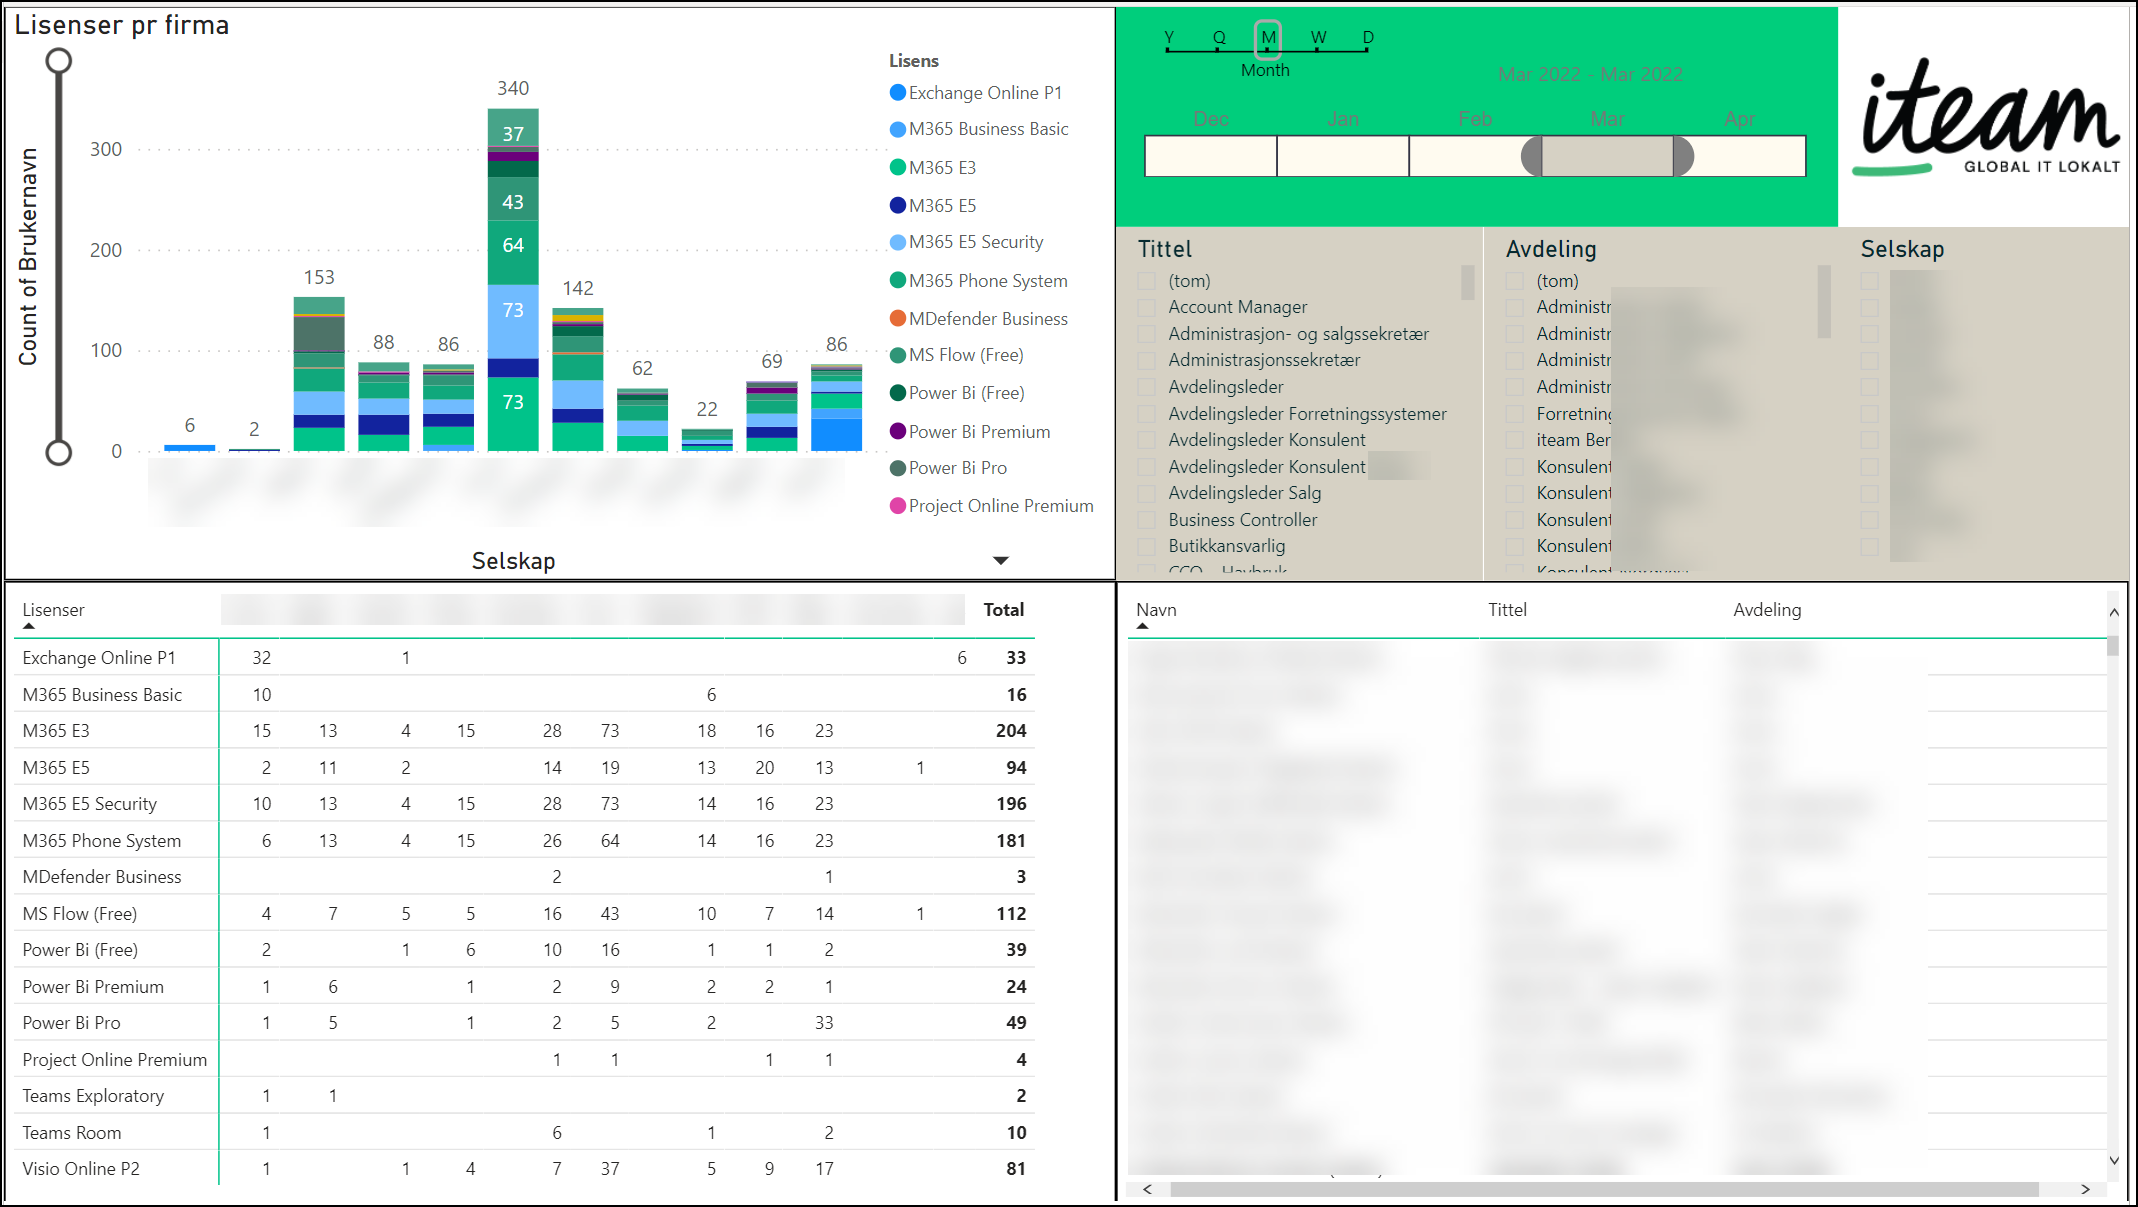
The report has several pages, where the first page gives an overview over license consumption based on company/department with both a graphical and detailed table overview as well as personal details. The report can easily be filtered by clicking on the values in each part of the report.

Click for a larger version

Page two of the report has got a timeline showing the development of Microsoft licenses over time. The report can be filtered by company/department, license or user. This gives an insight to license usage which can't be found elsewhere. The picture below is an example where you clearly can spot a change in SKUs on a large amount of users over time. 

Click for a larger version

In some cases there has been developed even further report pages in order to address the need of insights to the usage of Microsoft licenses, and these reports have several times been used to detect misallocated licenses which in turn have resulted in significant cost savings over time. An example of such report could be the one including groups used to assign licenses to the user accounts.

Click for a larger version

Regarding costs for running the function and cosmosdb in Azure, they seems to be reasonably low. A typically SMB company with arround 200 users shows cost arround 5 NOKs for one month. 

Please let me know if you find this kind of technological usage interesting.

Monday, August 9, 2021

Kundereferanse: Microsoft 365 hos Vikenco

Den moderne arbeidsplassen er preget av høy endring og stadig økende krav til effektivitet og samhandling. #Microsoft365 har blitt en kraftpakke av verktøy for bedrifter.

Vær med ut til Vikenco AS og se hvordan jeg har hjulpet de å utnytte mulighetene i Microsoft365 til å understøtte den moderne arbeidsplassen på en sikker og enhetlig måte. 

Jørn og Simon i samtale om den moderne arbeidsplassen

En kan ikke gjøre alle til lags, men med Microsoft 365 kan de fleste ønsker om å kunne jobbe uavhengig av tid, lokasjon og enhet oppfylles på en sikker måte. Se filmen fra Vikenco her: