Senior Cloud Consultant at CloudWay - Microsoft 365 specialist.
Highly certified within Microsoft 365, Intune, EMS, Azure, Teams, Cyber Security and more.
Versatile background, good documentation, technical flair, keen interest and ability to improvise are good ingredients in projects I’m involved in.
The handling of contacts in Microsoft Teams is for many users a step backwards related to Skype for Business. Could it be that we could find some alternative approaches for handling contacts?`
The fastest way to start an IM
Most conversations starts with an instant message. Lets look at some fast ways to start an instant message.
Windows Search
If you use Windows Search (Win+S) and search for your colleague, you will have a direct shortcut to start an IM.
Search for users in Windows Search and start an IM directly
Edge browser Search
If you have logged in to the new Edge Chromium browser and picket the Office365 content, you can search directly inside your company for people and start an IM.
Log in to your Edge browser to get direct access to 365 content and search
Start an IM directly from the Search results
Contact card in Office applications
Wherever you see your contacts in the Office applications or portals, you can hover the mouse on the contact in order to open a contact card with extended information and contact information. Here you can easily start an IM directly.
Hover the contact card and start an IM directly
Contacts handling in Teams
Some users are also complaining about the handling of contacts in Microsoft Teams. In general your Outlook contacts are synced to Teams. Please be aware that it's only one contact list from Outlook that gets synced to Teams. If you have multiple contact lists, its the default list that gets synchronized. You can figure out which one this is by checking Contacts Properties - Outlook Address Book. The checkmark for showing the folder as an email address book is greyed out for the default address book that is synchronized towards Teams.
The default Outlook Contacts (Ctrl+3) are synchronized to Teams
Please be aware that it will take some time for new contacts to appear in Microsoft Teams - from 3 to 24 hours. Please also note that users are reporting that you have to add a company name to your Outlook contacts in order to get the available in Microsoft Teams.
The contacts syncing from Outlook will not give you the rich Teams communication possibilities. You will only have basic calling and email (if you have phone system integration. You can however add the contact as a Team Contact in the Speed Dial contact list in Teams. This will give you the rich communication possibilities provided by Teams. If you have the SIP/mail address in the Outlook contact card, you will have a merged contact card in Teams with all communication possibilities available. If you edit your Outlook contact after adding the Teams contact (add email address or IM address), please be aware of the delayed integration from Outlook Contacts to Teams (3-24 hours).
Example of Outlook Contact in Microsoft Teams lacking the rich communication features
User added as a Teams Contact
Example of Outlook Contact merged with Teams contact giving a unified view with all communication possibilities.
Requirements
Please be aware that you should have Teams registered as the chat app for Office in order for getting the quick access to Teams Instant Messaging in your computer.
Register Microsoft Teams as the chat app for Office.
Give feedback
Please leave a comment if you have additional experiences or tips related to this. If you like what you read, please share the information in social media - sharing is caring!
When receiving a Teams meeting invite from a person outside of your organization you should be able to forward this invite to the room resource. The Teams Room System should recognize the invite as a Teams meeting and display it in the display. This might not happen if you have implemented Safe Links in Advanced Threat Protection.
Automatically Process meeting invites
In order for the room resource to automatically accept the forwarded external Teams meeting invite, you have to set the following configuration on the room:
If you have configured the Advanced Threat Protection policy for Safe Links, you might experience that the meeting join URL is being rewritten in such a way that the Teams Room System can't recognize the meeting URL. The url is being rewritten to the format of "eur01.safelink.protection.outlook.com....."
Example of a rewritten link from ATP Safe Links
The result of this is a successfull reservation of the meeting in the room resource, but you can't join the meeting. The Teams Room System user interface shows a "..." button instead of a "join" button.
External meeting forwarded to Teams Room System with a missing join button.
The Safe Links solution
The solution to this problem is to add 'teams.microsoft.com' to the list of URLs that shouldn't be rewritten. We have added '*.microsoft.com/*' just to be sure to cover all variations of url's.
Add a reservation for the Teams meeting invite URL's in ATP safe link policy
External meeting forwarded to Teams Room System after modifying the safe link policy
The Outlook problem
I have seen situations where forwarding of external meetings to the Teams Room System has been working for some users, while other users in the same tenant has the problem with this missing join button on forwarded meetings.
Example of two meetings forwarded from two users where one has the problem
I have debugged this down to the version of Outlook running on the computer.
Outlook version 1908 build 11929.20708 have the problem when forwarding an external meeting invitation to Teams Room System.
Outlook version 2004 build 12730.20250 does not have the problem when forwarding an external meeting invitation to Teams Room System.
Update 19.10.2020 - problem has returned: Outlook version 2008 build 13127.20638 have the problem when forwarding an external meeting invitation to Teams Room System.
One workaround while waiting for an updated Outlook version is to use Outlook Web Access, since this is working independent of the Outlook version installed on the computer.
Forwarding calendar event to Teams Room System from OWA is working as expected.
Change Office channel
You can change office channel to monthly and start a manual update by use of the following commands in an elevated powershell window.
Changing to monthly channel and forcing an update of Office
Problem visible in Outlook Web Access
It may be worth noting that the problem is also visible in Outlook Web Access when looking at the calendar of the meeting room. Meetings sent from Outlook at the computer is missing the Join button in Outlook Web Access Calendar as well.
Meeting forwarded from Outlook on computer is missing the Join button in OWA
Meeting forwarded from OWA do have the Join button in OWA.
Could the problem be related to the Exchange service independent of the Microsoft Teams Rooms System?
Korona-pandemien som raser over verden i disse dager har fremskyndet den moderne arbeidsplassen. Skytjenester og den mobile arbeidsstokken har redefinert sikkerhetsperimeteret. IT miljøene flytter seg fra bedriftens lokale nettverk til skybaserte miljø. Data lever utenfor bedriftens nettverk og deles aktivt med eksterne samarbeidspartnere, leverandører og kunder. Ansatte tar i bruk sine egne enheter og jobber stadig mer fra hjemmekontor. I dette bildet trengs en ny sikkerhetsmodell som effektivt tilpasser seg det moderne miljøet. La oss snakke litt om Zero Trust og hvorfor det er ekstra viktig i disse dager.
Zero Trust er ikke en enhet eller et enkelt produkt man kan kjøpe. Det er mer en metodikk som benyttes for å sikre bedriftens data. Det nye sikkerhetsperimeteret er ikke lenger definert av en organisasjons fysiske lokasjoner – den er nå strekt ut til alle lokasjoner og enheter som kjører, lagrer eller aksesserer bedriftens digitale ressurser og tjenester. Dette skjer ofte utenfor bedriftens lokasjonsbaserte sikkerhetsløsninger basert på brannmurer og VPN forbindelser. Bedrifter som utelukkende benytter slike tradisjonelle sikkerhetsmodeller, greier ikke å få den nødvendige ende til ende sikkerheten som den moderne arbeidsplassen krever. Dagens sikkerhet må omfavne den moderne arbeidsplassen og beskytte individer, enheter, applikasjoner og data uansett hvor de måtte befinne seg. Dette er kjernen i metodikken som kalles Zero Trust.
Nå jobber flere enn noen gang fra hjemmekontor samtidig som data og applikasjoner flytter ut i skyløsninger. Da er man ikke nødvendigvis lenger beskyttet bak den flotte brannmuren på kontoret, og det er derfor viktig at IT løsningene sikres på nye måter.
Hva går Zero Trust ut på?
For å forklare dette på en enkel måte er prinsippet for Zero Trust å ikke stole på noen, verken personer, lokasjoner eller enheter. Alt må verifiseres før tilgang blir gitt. Personer og enheter må kunne verifisere seg før de får tilgang på de dokumenter, applikasjoner og data som de har tillatelse til. Dette må fungere uavhengig av om man er innenfor eller utenfor kontoret. Ansatte tar i dag med egne enheter og jobber fra hvor som helst uten å være innom bedriftens lokalnett. Sikkerheten må derfor bygges rundt brukerne, og de må identifisere seg på en trygg måte fra enheter som er verifisert sikre før de får tilgang til å jobbe med bedriftens data fra godkjente applikasjoner. Slik får bedriften sikret seg fra innsiden og ut.
Den tradisjonelle metoden for å ivareta bedriftens digitale eiendom kan minne om en borg med vollgrav basert på sikring av lokalnett, filstrukturer og serverløsninger. Dette har fortsatt en viktig rolle for bedriftens sikkerhet, men vi trenger nye løsninger for å også beskytte oss i dagens skybaserte verden. Vi må sikre påloggingen slik at vi vet med sikkerhet at det er riktig person som får tilgang. Vi må sikre at tilgangen skjer fra en enhet som har god nok helsetilstand, og vi må sikre at det er tilgang til kun de data man skal ha tilgang til på aktuelt tidspunkt. Dette må fungere selv om både brukere, applikasjoner, enheter og data er utenfor borgen og vollgraven.
Mange bedrifter har i dag en praksis som avviker stort fra Zero Trust-metodikken. Mange har hørt om det, men vegrer seg fra å sette i gang tiltak for å få dette på plass – selv om de aktivt bruker skytjenester og tillater tilgang til bedriftens data fra enheter og applikasjoner de ikke har kontroll over. I disse dager er dette et høyaktuelt tema hvor ansatte i tillegg oppfordres til å jobbe utenfor kontoret, på usikrede hjemmenett og gjerne fra dårlig administrerte enheter. Bedriftens data er mer sårbar enn noen gang.
Maskinlæring, kunstig intelligens og automatikk
Organisasjoner må kunne tilby sikker tilgang til sine ressurser uavhengig av brukerens miljø. Før tilgang kan gis, må vi blant annet være sikre på brukerens lokasjon, brukerens rolle, enhetens helsetilstand samt kjenne klassifikasjonen på dataene de ønsker tilgang til. For å få en effektiv håndtering av dette benyttes automatiserte regler, maskinlæring og kunstig intelligens for å få den riktige balansen mellom sikkerhet og best mulig opplevelse for brukerne.
Det har historisk sett vært utfordrende og tungvint å få tilgang til internområder, dokumenter og andre data når du jobber fra andre steder enn arbeidsplassen. Den moderne arbeidsplassen gjør det enklere enn noen gang å jobbe hjemmefra og samtidig opprettholde produktivitet på en fleksibel måte. Zero Trust-metodikken underbygger og sikrer den moderne arbeidsplassen.
Ved å sette opp bedriftens sikkerhetsprosedyrer gjennom en Zero Trust-metodikk, vil den enkelte ansatte få tilgang til det en skal ha på en sikker måte fra hvor som helst i verden. Zero Trust-metodikken er rett og slett en ny måte å drive intelligent sikkerhet basert på automatisk håndheving av sikkerhetsregler for å sikre samsvar med tilgang i hele den digitale reisen. Basert på regelsett i forhold til bruker, enhet, applikasjon, informasjon om plassering og risiko kan man bedre kontrollere hvordan brukere får tilgang til bedriftens ressurser og tjenester. Regelsettene brukes til å bestemme om det skal tillates tilgang, nektes tilgang eller kontrollere tilgang med ekstra autentiseringsutfordringer (for eksempel flerfaktorautentisering), bruksvilkår eller tilgangsbegrensninger. Det hele understøttes av kunstig intelligens og maskinlæring.
Hvordan komme i gang
Sikkerhet er et område som stadig krever ettersyn og utvikling. Microsoft 365 har de verktøy man trenger for komme i gang med en Zero Trust-praksis. Det er viktig å huske at dette ikke er et arbeid man blir ferdig med. En Zero Trust tilnærming bør strekke seg over hele den digitale eiendommen til bedriften. Dette gjøres ved implementasjon på tvers av seks grunnleggende elementer: identitet, enhet, applikasjon, data, infrastruktur og nettverk. Hver av disse elementene er kilder som går inn i håndhevelse av sikkerheten, og er slik sett viktige områder å fokusere på.
Identitet
Uansett om det gjelder personer, tjenester eller internet-of-things (IOT) enheter, har de identiteter som inngår i kjernen av Zero Trust. Ved tilgang til en ressurs, må identiteten verifiseres på en sikker måte og sjekkes opp mot gyldighet, normaliteter og tilganger. Med Azure Active Directory (Azure AD) og Intune kan bedriftene være trygge på at mobile ansatte kan få tilgang til ressurser på en sikker måte, uten at det går ut over produktiviteten. Når man jobber fra usikre nettverk kan man skru på MFA (Multi-faktor-autentisering) som vil sørge for at brukerne må bruke en form for bekreftelse på at de er den de utgir seg for å være før de får tilgang. Her kan man også benytte betinget tilgang basert på en total sikkerhetsvurdering knyttet til enhet, lokasjon, tidspunkt med mere.
Tradisjonelt identifiseres identiteter ved brukernavn og passord uten enhetlig pålogging mellom tradisjonelle systemer og skybaserte tjenester. En mer avanserte form gir integrerte og federerte løsninger, betingelsesbaserte tilgangsløsninger med tilhørende analyser. Den optimale løsningen har passordløs tilgang og sanntids risikoanalyser.
Enhet
Identitet og enheter er de primære elementene for sårbarhet i et cyberangrep. Når identiteten har fått tilgang til en ressurs, kan data flyte til en mengde forskjellige enheter som IOT enheter, smart telefoner, private enheter og administrerte bedriftsenheter. Dette mangfoldet gir en massiv angrepsflate, noe som krever overvåking og strenge krav til enhetens helsetilstand og samsvar for å sikre tilgangen.
I en tradisjonell løsning er enhetene administrert gjennom tjenester som krever tilstedeværelse på lokalnettet til bedriften. I en mer avansert løsning er enheten registrert mot skybaserte løsninger for drift. Den optimale løsningen har automatiserte tjenester for deteksjon og monitorering.
Applikasjon
Data blir betjent i applikasjoner. Dette kan være alt fra tradisjonelle lokale applikasjoner til skybaserte tjenester. Her må man sikre at rettigheter og tilganger blir ivaretatt. Her må man kunne kontrollere og sikre eventuell bruk av applikasjoner som brukerne innfører (skygge-IT). Løsningen må overvåke og ha sanntids analyse for å avdekke unormal adferd.
Tradisjonelt sett er applikasjoner tilgjengelig på fysiske lokale nettverk og over VPN løsninger. Mer avanserte løsninger gir tilgang over internett med enhetlig pålogging (SSO) hvor kritiske applikasjoner er overvåket og kontrollert. En optimal løsning gir tilgang til alle applikasjoner med minste tilgangsrettigheter hvor man også har overvåking og monitorering på alle skybaserte applikasjoner.
Data
Bedriftens data representerer bedriftens verdi, og de bør være sikre selv om de skulle forlate enheter, applikasjoner, infrastruktur og nettverk som er under administrasjon av bedriften. Data bør derfor klassifiseres, merkes og krypteres. Tilgangskontrollen kan så bestemmes ut fra attributtene tilhørende dataene.
Tradisjonelt sett har man styrt tilgang basert på perimeter tilgang, og ikke dataenes sensitivitet. En mer avansert metode er å klassifisere og merke data, samt kryptering av data. Den optimale løsningen bygger på maskinlæring, skybaserte sikkerhetsregimer og regelverk for å hindre datatap med kryptering og sporing.
Nettkriminelle ønsker å få tak i bedriftens data – for å kunne bruke dette på en eller annen måte – enten det er for å kryptere filer eller stjele informasjon. Med Microsoft Information Protection, kan man forbedre beskyttelsen av sensitiv informasjon—uansett hvor informasjonen befinner seg. Dataene vil kunne beskytte seg selv uten å måtte ligge i en gitt filstruktur. Microsoft 365 gjør det mulig å:
Identifisere og klassifisere sensitive data manuelt og automatisk
Bruke fleksible beskyttelsesregler.
Overvåke og utbedre sensitive data som er i faresonen.
Infrastruktur
Telemetri bør benyttes for å oppdage angrep og unormal adferd knyttet til infrastruktur for å automatisk blokkere, varsle og ta beskyttende handlinger. Med Microsoft 365, kan bedrifter styrke sin evne til å beskytte, oppdage og svare på angrep med Microsoft sin integrerte og automatiserte sikkerhet. Her benyttes Microsoft Intelligent Security Graph og avansert automatisering som er drevet av kunstig intelligens (AI) for å forbedre identifisering og respons av hendelser. Slik kan sikkerhetstrusler løses nøyaktig, effektivt og raskt.
Nettverk
Alle data blir konsumert over nettverk, og kontroller i nettverket kan bidra til å hindre at angripere beveger seg sideveis gjennom nettverket. Nettverk bør derfor være segmentert og ha sanntids beskyttelse, kryptering, monitorering og analyse implementert.
Microsoft 365 vil forenkle administreringen av sikkerheten dersom man ønsker å få på plass en Zero Trust-metodikk.
Når du skal vurdere hvordan du skal sikre dine data, enten de finnes i skyen eller på servere, vil vi anbefale en Zero Trust metodikk som den best egnede praksisen. Bakgrunnen for dette er hvordan arbeidssituasjon er for mange i dag – og vil være i all tid fremover. Metodikken er mest effektiv når den er integrert over hele den digitale verdikjeden. De fleste organisasjoner vil ha en fasebasert tilnærming rettet mot bestemte områder. Dette bygger ut fra modenhet, tilgjengelige ressurser og prioriteringer. Det første trinnet på reisen trenger ikke å være et stort løft eller en total omlegging, men gjerne en forlengelse av eksisterende løsninger og investeringer. Hvert steg på veien vil utgjøre en forskjell med tanke på å redusere risiko og sikre den digitale eiendommen. Det viktige er her å komme i gang.
Microsoft 365 kommer i ulike utgaver hvor man kan velge de verktøy og funksjoner man trenger. Med riktig nivå på grunnsikringen kan du fokusere på innovasjon og utvikling av egen forretningsdrift.
The Modern Workplace supports the demand to work from anywhere. There are companies today operating mainly from home offices. How much technology is acceptable to use for hiding in the home office?
I have been experimenting with knowledge from the photography business and technology from youtuber's in the gaming industry to enrich my Microsoft Teams meetings from my home office. The goal has been to have high quality video conferencing with a simplified and quick operation. This attempt is presented in the following low cost one shot video.
Technical rundown
There has been some questions related to this setup on Twitter, so I decided to make a technical rundown of the setup.
Lights
In order to have a good picture with studio portrait quality, I need good lights. After exploring different options I ended up ordering an Elgato Key Light Air as my main light. This choice was a combination of price and lamp design and features. This lamp has a great stand, it connects wirelessly to my computer, it is cool and brightness and color can easily be controlled.
In addition I am using some Phillips Hue light sources. I have one color light source behind my monitors for ambience light, and in the ceiling I have a ledbar from IKEA which has been equipped with Hue GU10 white ambience light bulbs. I have created some scenes in the Hue system for my video conferencing setup. Two of the GU10 lights in the ceiling are pointed at the green screen trying to make an even light all over the screen. These lights has a cold temperature set in order to make the color of the green screen stand out. I have also pointed one of the GU10 hue lights towards my head to make a hair light for background separation. This light as a warmer tone set. I don't think I need any more fill lights for my current setup.
Workplace with hue ambient light
Workplace with hue ambient light and key light
Hue fill lights for green screen and hair light for background separation
Hue ambient light behind monitor
The Hue scene used for videoconferencing.
Green screen
I have considered several types of green screens. Based on my experiences in studio photography I wanted a solid type to avoid folds which in turn can be troublesome related to lighting and chroma key processing. I had my eyes on the roll-up versions from Elgato and Nebula. These are around 148 cm wide, and they seem easy to fold up an down. These can easily be found cheap on second hand webshops since there are a lot of fading youtube stars out there. I read some reviews and found them to require some floor space. They could in some circumstances also be wider. Some where experimenting with two of these to get enough width on the background - this is kind of tricky in order to get a perfect faded overlapping background.
I finally found the 190 cm wide Elgato Green Screen MT which can be easily mounted in the ceiling. This one will cover my entire bookshelf without taking up any space on the floor. I had some concerns related to the weight when mounted in the ceiling, but in practice this was not a problem. Unfortunately no Elgato Green Screen MT was found on second hand marketplaces, but it wasn't the most expensive one. When bought as new, I also got first class packaging and shipping. I certainly do not regret this choice.
Bookshelf and guitars with Green Screen MT rolled up in the ceiling
Bookshelf and guitars hidden behind Green Screen MT rolled down from the ceiling
Detail from the mounting of the Green Screen MT in the ceiling
Green Screen processing
In order to do a chroma key processing of the green screen, I am using the OBS Studio freeware. This is a software primarily made for streaming to Twitch, YouTube and other services. In this project I am using the VirtualCam function found in the Tools menu. This sends the output mix from OBS to Windows as a virtual camera driver and can therefore be selected as source in Microsoft Teams. The VirtualCam has been set to AutoStart.
Configuration of the VirtualCam in OBS
OBS-Camera selected as Camera in Teams - Settings - Devices - Camera
In OBS I have configured different scenes and scene transitions. Each scene can consist of a mix of several sources, including physical cameras attached to the computer, images, media sources and more. As a webcam I am currently using a Logi HD Pro WebCam C920. Inside OBS I have added a Chroma Key effect filter to this camera source in order to make a transparent background from the green screen. This combined with some environmental photos can make some exciting scenes. The OBS software has a lot of advanced opportunities, and you can easily find information and inspiration on this on YouTube.
1: Scenes, 2: Sources used in scenes, 3: Scene transitions, 4: Filters used on sources in scene
1: Add the Chroma Key filter, 2: Adjust the different variables, 3: Pay attention to the edge transitions
Filters
OBS has a rich pallette of options and third party plugins. One great valueadd to OBS studio is the StreamFX pluging which has a couple of great filters to enrich your setup. Alpha Gaming is giving a nice overview of this in his YouTube channel. I use the Blur filter from this package to add a small amount of blur on my background image. This technique can be used to imitate a picture with a shallow depth of view often seen by using DSLR's with pricy optics connected through Elgato Cam Link.
StreamFX Blur plugin applied to my background image
Props
When working on the different backgrounds, it is allways funny and effective to have props to put on your self in order to enhance the effect. A couple of examples in the following images.
Having a good time at my cottage
Having a good time at my home office, aka "jammekontor"
Having a rough time out in the field
Control Panel
In order to operate these technologies quick and easy, I am using a Stream Deck from Elgato. This system with all of its plugins has innumerable opportunities regarding automation and control. I have created many functions that support me throughout the day in the office.
Elgato Stream Deck located under my monitors
In order to easily do a Microsoft Teams meeting, I have set up a Multi Action button with 10 actionpoints [1: Launch OBS Studio, 2: Pause Spotify, 3: Set Hue scene for videoconferencing, 4: Turn on KeyLight, 5: Set Key Light temperature, 6: Set Key Light brightness, 7: Select OBS Scene, 8: Move Microsoft Teams to full screen, 9: Delay for 3s 10: Go to Calendar in Teams].
Configuration of the Multi Action button for starting a Teams meeting
Actions included in the Multi Action button for starting a Microsoft Teams meeting
In the same way I have created a Multi Action button with 4 actions to use when ending a Micreosoft Teams meeting [1: Play Spotify, 2: Set Hue scene for normal office work, 3: Turn off Key Light, 4: Minimize Microsoft Teams 4: End OBS Studio]
Actions included in the Multi Action button for ending a Microsoft Teams meeting
During a Teams meeting I have found it handy to have some special actions available. These are located in a separate folder containing a new set of buttons. Today I am using these to switch between the different scenes in OBS. These scenes includes different backgrounds, screensharing with talking head etc. I have also made a button for muting the microphone.
Stream Deck with OBS Scene controls and Mic mute
OBS Scenes with corresponding buttons for toggling sources on and off
Teams meeting with OBS VirtualCam
Teams meeting with OBS VirtualCam and Background Blur in Microsoft Teams
Teams meeting with OBS Scene in with screen sharing and talking head
The talking head challenge
I do experience some blured image quality on screensharing through OBS Virtual Camera plugin to Microsoft Teams meeting. I have tried to figure this out without any success yet. In a regular Teams meeting with VirtualCam, I don't think screensharing through OBS and VirtualCam is a good idea.
I have found a working setup for sharing your screen with a talking head directly to a Teams meeting. This requires multiple monitors. In my example I have a 3 monitor setup. This setup will give sufficient quality on the content shared into the meeting.
Monitor#1 is used as a stage, running OBS in fullscreen projection. I have a scene with content from Monitor#2 and a talking head overlay. I will share Monitor#1 into the Teams meeting.
Monitor#2 will be the workspace for content shared to the meeting. All content on this monitor will be shared to the meeting (powerpoints etc). A pro tip would be to place the cam and the workspace monitor in such a way that your head is looking inbound to the monitor in the shared window when working.
Monitor#3 is my Teams management monitor used to control the Teams meeting, OBS settings etc. This should be the main monitor for popups etc.
Three monitor setup for sharing screen with talking head into Teams
Right click in the preview and select Fullscreen Projector
Stream Timer
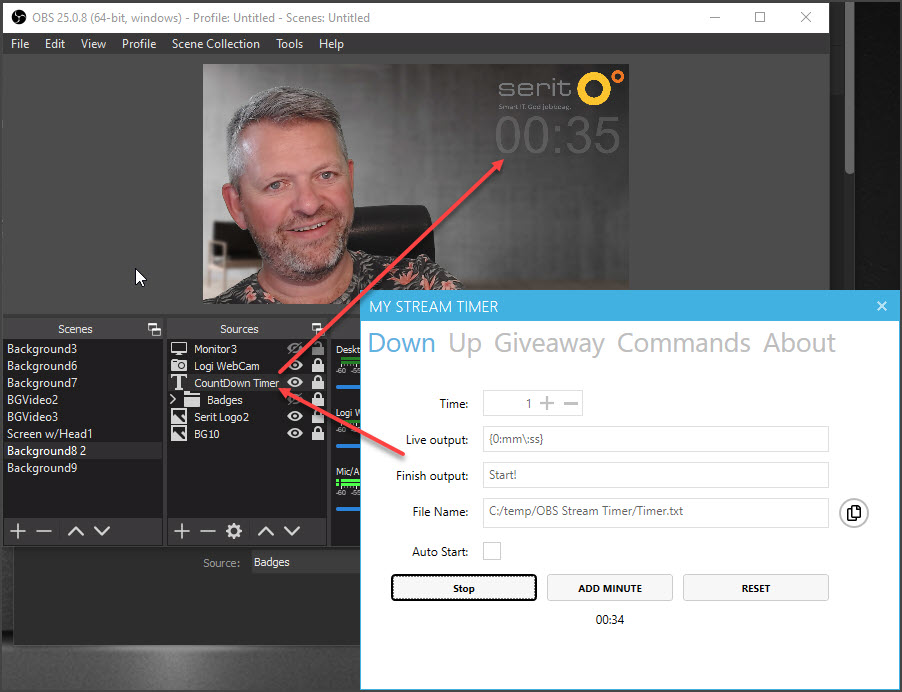
In some cases, a counter is desirable. This is often done with the help of a third party software updating a txt file which is added as a text layer in OBS. There are many free providers, some simple while others are more advanced. One example is http://www.mystreamtimer.com/ which can do both count down and count up in addition to have a leading text and a separate ending text. This can even be triggered directly from Stream Deck! Another simple one is the free Countdown Timer v2.0.
I got challenged by Ståle Hansen to include his Pomodoro powershell script into the Stream Deck. This has been testet and found Ok. I had some initial problems when using the "advanced launcher" plugin loading "C:\Windows\System32\WindowsPowerShell\v1.0\powershell.exe -file Start-SimplePomodoro.ps1". This powershell session didn't find the "presentationsettings" command. I had to use the "Super Macro" plugin instead. Now I have a separate button on my Stream Deck for launching 20 minutes of focus with no distractions.
Pomodoro powershell added as a button in my Stream Deck.
Alternative Pomodoro routine created with actions in Stream Deck
Embrava Busy Light
After the korona virus breakout, I have had my house full of three kids since the norwegian schools and kindergardens where closed. In order to let the kids know my working status at the home office, I have extended my home office setup with an Embrava Blynclight. This light indicates when I am "on air". This gives a better experience to my calls and meetings run from the home office during this pandemy.
Busy light on my monitor before it was moved next to the door leading to the home office.
PS! After a quick computer reset (windows autopilot), I had a problem connecting the blynclight to Microsoft Teams. This got solved after installing the Skype for Business client (the Office installation came without SFB client which I needed for customer support). Embrava support has investigated this issue and found that the Office 365 installation suite some times corrupting the registry keys required for Office Chat API interface. If such registry keys are corrupted then the Office Chat API interface won't work. A re-install or repair of the Office installation are often fixing this issue. In my case, the installation of the Skype for Business Client did. Embrava is working on a new driver version connecting directly to the Microsoft Teams server in order to get arround this problem. My guess is that they will use the Microsoft Graph API.
Snap Camera
Snapchat has lauched the Snap Camera application for Windows and MAC, bringing the magic of lenses to the video chats on PC & Mac. This can be used directly into Teams, and it can also be included in the OBS Studio. Could be kind of funny in some situations, but mostly annoying. It is also annoying that Snap Camera requires exclusive access to the webcams on your computer.
Webcamera as source
In the new Windows 10 2004 update (build 18995), it is possible for users to associate network cameras to their PC, enabling photo capture and streaming of video in camera applications. Currently Windows only supports ONVIF Profile S compliant cameras*, which are standards-compliant network cameras optimized for real-time streaming video capture. Windows provides support for discovery, pairing, configuration and streaming via WinRT APIs. These settings are described in this website. I can't wait to use a live webcamera as a source in my OBS setup!
Logitech Capture
Logitech Capture is an alternative software for managing multiple content, talking head etc. I have done some small tests, but it will not replace my usage of OBS studio. It does not integrate into the Elgato Setup, and the chroma key functions are poor compared to OBS.
Testing Logitech Capture.
Teams Customized Backgrounds
Microsoft is rolling out customized backgrounds as part of the native Teams experience. This means you now can replace the background directly in Microsoft Teams. You will find this option as part of the background blur in your Teams client. This is a nice lowcost feature, but it does not compare to a full green screen setup, and all the features you have in OBS studio - for instance add a background video.
Microsoft will sooon release the option to upload your personal images. You can however do this manually by copying your photos to the following folder: %APPDATA%\Microsoft\Teams\Backgrounds\Uploads\
Select background blur and pick your preferred background.
I have added a screenshot of my normal background with me present. Now I can walk away from the meeting but still be present :)
Use with other video systems
I have used this OBS Studio setup with the virtual camera plugin with other video systems as well - even Skype for Business. This proves that this setup is universal to all systems utilizing a webcamera on the computer.
End notes
Is this acceptable use of technology or is it overkill? Is this something you could imagine in your office or home office? Microsoft has announced a customized background feature in Microsoft Teams comming later this year. Could it be a good idea to paint a wall in your office green and install a key light for better quality during Microsoft Teams Meetings?